Here we will learn how to use view scaffold templates in asp.net mvc. Before understanding view scaffolding templates in asp.net mvc, we will learn what is scaffold in asp.net mvc and how to use it in our asp.net mvc applications.
Scaffolding is a technique used in asp.net mvc to generate basic CRUD operations (Create, Delete, Details, Edit, and List) from Model. Still, it is a basic code that we need to edit and customize code according to our requirements.
Now let’s create a basic ASP.NET MVC 4 application to understand View scaffolding Template for that Open visual studio à Go to File à Select New à Select Project.
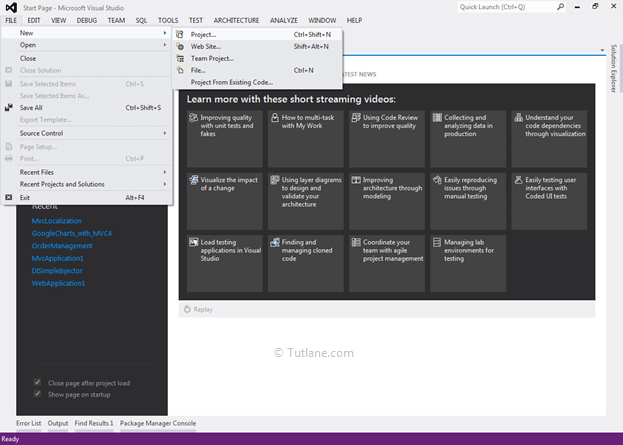
After that, you will see a new dialog for selecting your Template and Project type. From Templates, select Visual C# à inside that select Web and then project type select ASP.NET MVC 4 Web Application, and here we are giving the name as “MVCDemo” then finally click on OK button.
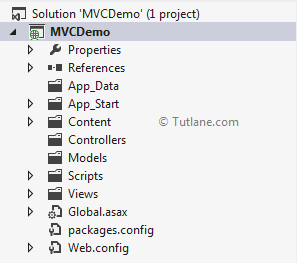
A new dialog will pop up for selecting a template in that Select Basic Template and click ok it will create our MVCDemo project that will be shown below.
After completion of creating applications, it’s time to create a database. For showing demo, we already created a Database with the name EmployeeDB and a table with the name EmployeeDetails like as shown below.
EmployeeDB Database
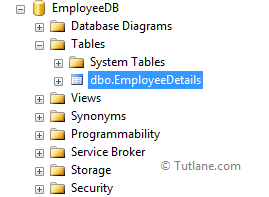
EmployeeDetails Table

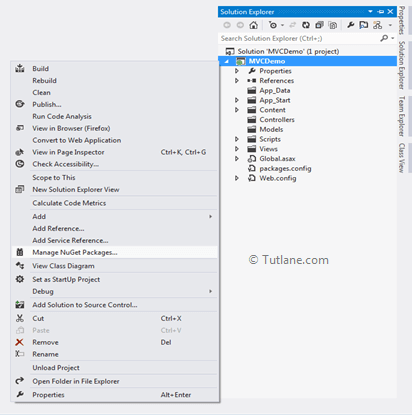
For adding Entity framework, right-click on your application, and from the above list, select “Manage NuGet Packages” as shown below.
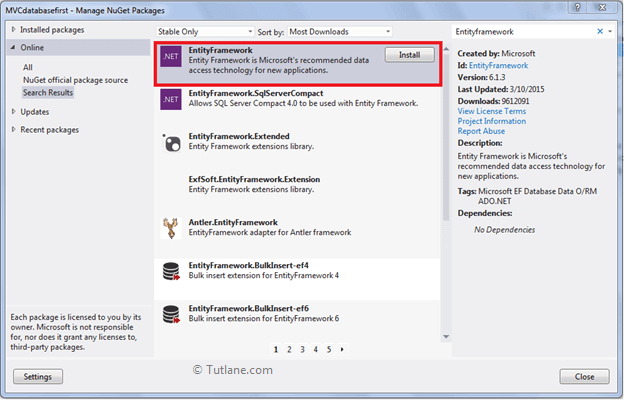
In the new dialog popup of “Manage NuGet Packages” inside the search box, enter “Entityframework”. After getting the search value, select Entityframework click on the install button.
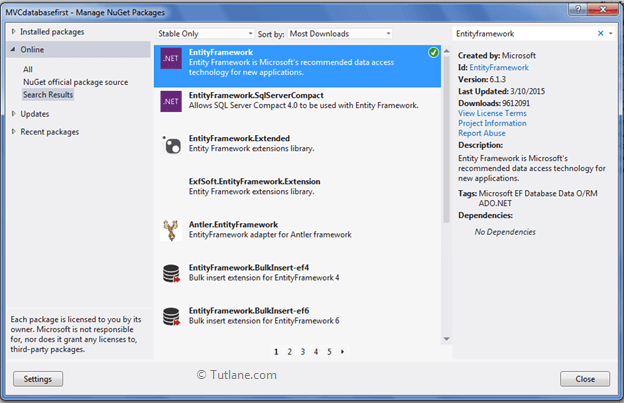
After adding, it will show an ok sign in green color like as shown below.
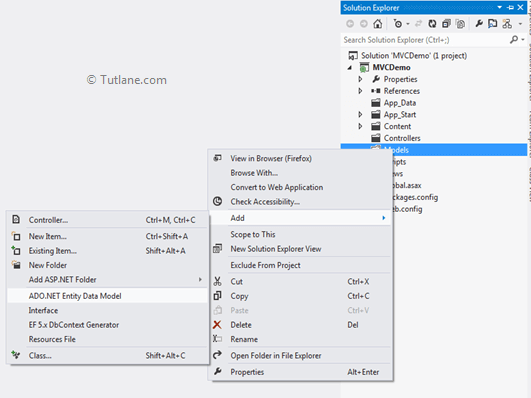
After adding the Entity framework, we are going to add ADO.NET Entity Data Model.
For adding ADO.NET Entity Data Model, right-click on the Model folder and select Add inside that Select ADO.NET Entity Data Model.
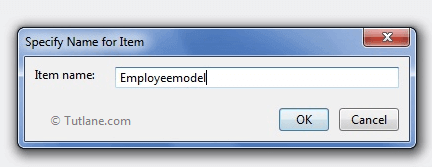
After clicking on ADO.NET Entity Data Model, a New Dialog will pop up for entering the Item name. Inside that, you can enter any name, but it must be unique and click on the OK button like as shown below.
After that, a new Wizard will popup, as shown below.
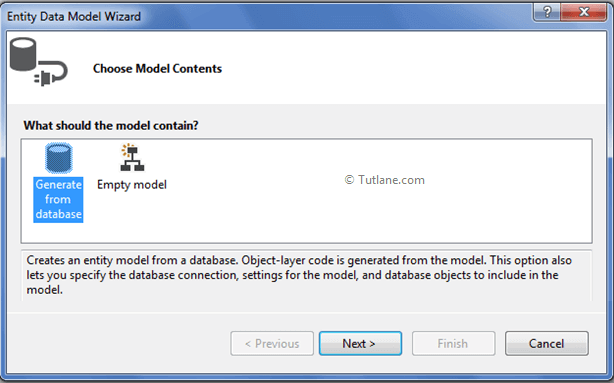
From that, select Generate from database and click on the Next button. After clicking on the Next button, a New Wizard will pop up for Choosing Data Connection.
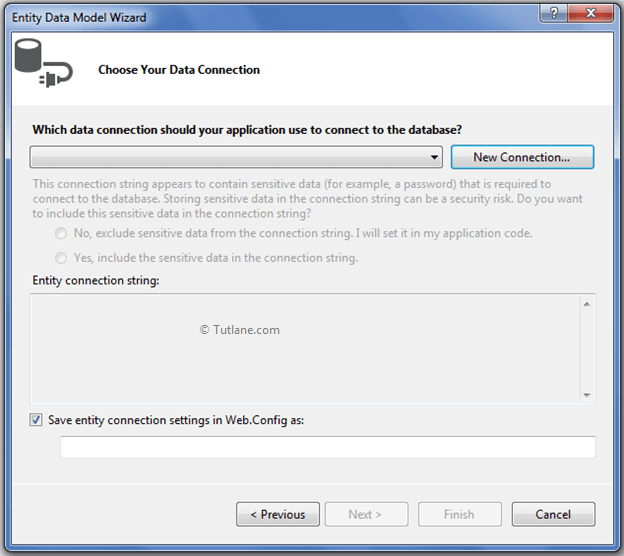
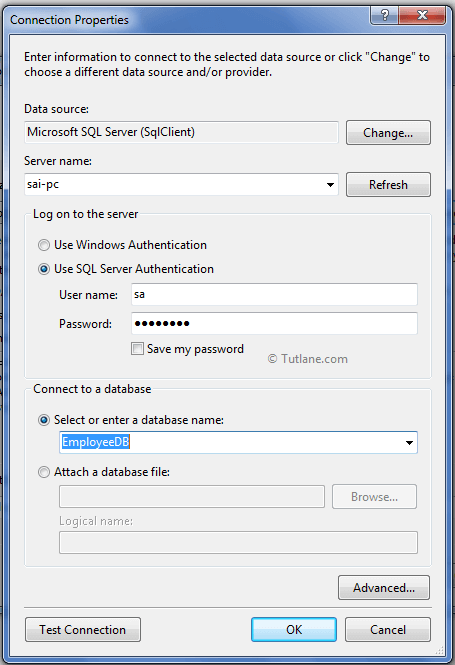
Now click on New Connection, new Dialog will popup. Here we need to configure it. In Server name, you need to add your SQL Server Name and select either Using Windows Authentication or Using SQL Server Authentication to connect SQL Server. Here we selected Using SQL Server Authentication and entered the User name and Password of the SQL server. Last, we will select Database Name EmployeeDB and click on the OK button, as shown below.
After adding the database connection, our Entity Data Model Wizard will look like the below snapshot.
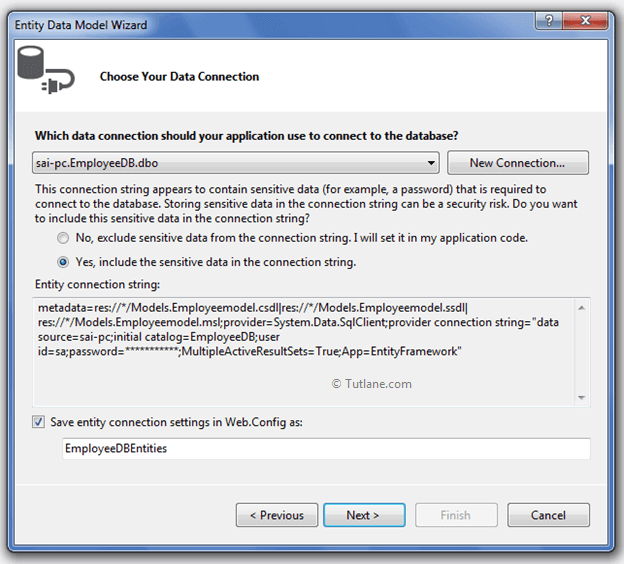
Now click on the Next button. A new wizard will pop up for selecting a database object, and in this, you will see all the tables we have created in the database.
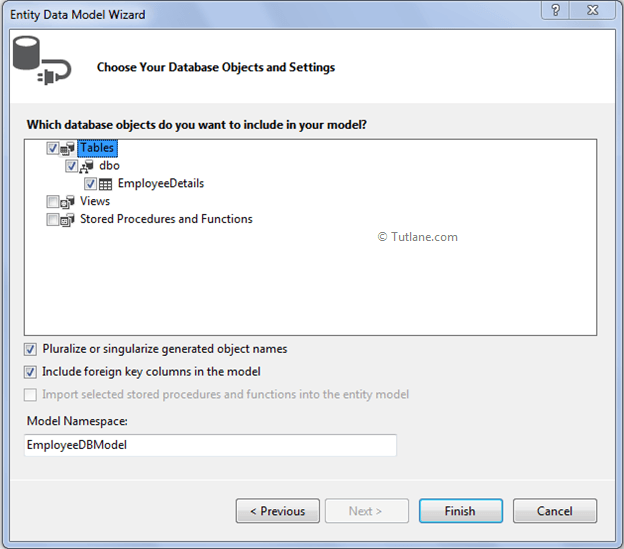
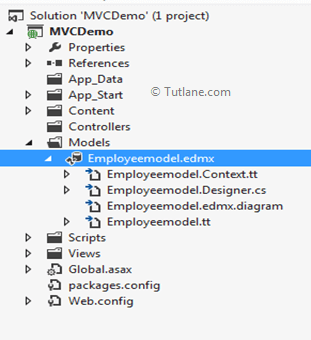
Finally, click on the Finish button. Here is a snapshot after adding ADO.NET Entity Data Model
We will add controller in our application for that Right-click on Controller Folder inside that select Add and then select Controller. After clicking on Controller new dialog will pop up with the name Add Controller in that mention controller name "Default1Controller" and select template as Empty MVC Controller and click Add like as shown
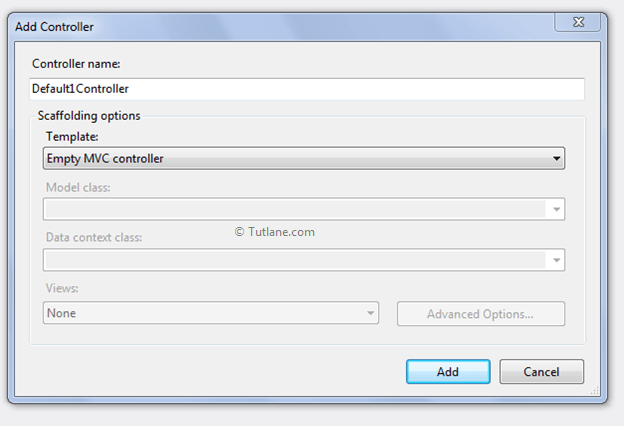
We created one simple controller, "Default1Controller" and it will contain code like as shown below.
using System;
using System.Collections.Generic;
using System.Linq;
using System.Web;
using System.Web.Mvc;
namespace MVCDemo.Controllers
{
public class Default1Controller : Controller
{
[HttpGet]
public ActionResult Create()
{
return View();
}
}
}
Now let’s Add View to this controller and, while adding, understand all properties of scaffolding.
We are going to Create Various types of View.
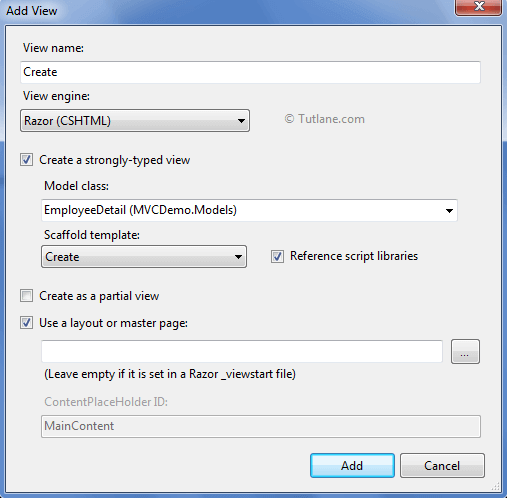
To add view. right-click inside the DefaultController Create Action Method and select Add View. A new wizard will popup with Name Add view. The View name will be your Action Method Name inside that we have just right for adding View. If you want to change the name of the view, then you need to return a view of that Name (return View("Create"); ) else, you need to change your Action Method Name. Now we will select required options in the popup like view engine, scaffold templates. While selecting a view engine, we have two view engines available those are
We can select either a razor or ASPX view engine used to generate the view in view engine. After generating a view, we are not locked with the selected view engine. We can change that any time, but for simplicity, we will prefer to use Razor syntax.
After selecting the View engine, let’s move towards selecting Model Class to create a strong typed View. In that select EmployeeDetail (MVCDemo.Models) in case If you are not getting model in Model class dropdownlist, then rebuild your application.
After completing Model Class selection, we will select the required template in the Scaffold template here. We have to choose a Template (Create, Details, Delete, Edit, and List). According to our selection, it will analyze and generate a form for us. If we select Create, then it will generate a Create Form for us according to our Model selected like as shown below.
Finally, we can make our view a partial view by checking Create as a partial view option. When we check this option, the layout or Master page will get disabled. If you don’t want to select this Create as a partial view option, you can leave it unchecked.
The last thing, if we want a Master page (layout) for your View, check to Use a layout or master page option and we can also browse master page whatever we want to set it for our view else leave this option unchecked and finally click on Add button to generate view according to our configuration.
Following is the code snippet of Create.CSS HTML View that is generated.
@model MVCDemo.Models.EmployeeDetail
@{
ViewBag.Title = "Create";
}
<h2>Create</h2>
@using (Html.BeginForm()) {
@Html.ValidationSummary(true)
<fieldset>
<legend>EmployeeDetail</legend>
<div class="editor-label">
@Html.LabelFor(model => model.EmpID)
</div>
<div class="editor-field">
@Html.EditorFor(model => model.EmpID)
@Html.ValidationMessageFor(model => model.EmpID)
</div>
<div class="editor-label">
@Html.LabelFor(model => model.Name)
</div>
<div class="editor-field">
@Html.EditorFor(model => model.Name)
@Html.ValidationMessageFor(model => model.Name)
</div>
<div class="editor-label">
@Html.LabelFor(model => model.Address)
</div>
<div class="editor-field">
@Html.EditorFor(model => model.Address)
@Html.ValidationMessageFor(model => model.Address)
</div>
<div class="editor-label">
@Html.LabelFor(model => model.Age)
</div>
<div class="editor-field">
@Html.EditorFor(model => model.Age)
@Html.ValidationMessageFor(model => model.Age)
</div>
<div class="editor-label">
@Html.LabelFor(model => model.Salary)
</div>
<div class="editor-field">
@Html.EditorFor(model => model.Salary)
@Html.ValidationMessageFor(model => model.Salary)
</div>
<div class="editor-label">
@Html.LabelFor(model => model.worktype)
</div>
<div class="editor-field">
@Html.EditorFor(model => model.worktype)
@Html.ValidationMessageFor(model => model.worktype)
</div>
<p>
<input type="submit" value="Create"/>
</p>
</fieldset>
}
<div>
@Html.ActionLink("Back to List", "Index")
</div>
@section Scripts {
@Scripts.Render("~/bundles/jqueryval")
}
This is code is automatically generated by a visual studio based on our configuration. It really makes development easy and fast now, run your application and access your View that we have created.

After completing Create View, let's create another View (List View) to show record details.
Before adding the view, we need to add Action Method with Name ListOfEmployee in our controller like as shown below.
public ActionResult ListOfEmployee ()
{
return View();
}
To add view, right-click inside the DefaultController ListOfEmployee Action Method and select Add View. A new wizard will popup with Name Add view.
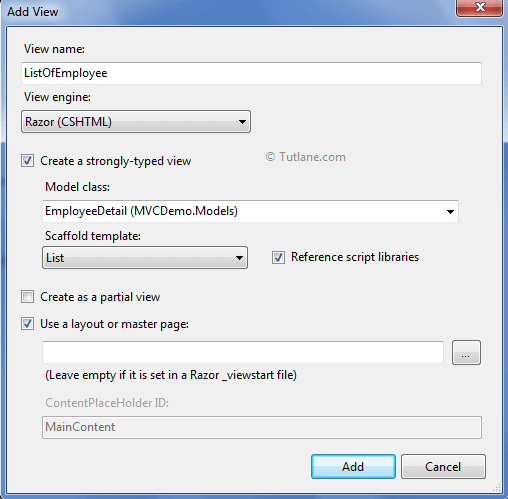
If you observe the above view, we selected the Scaffold template as List, remaining all options are the same. We will not change the Model class (EmployeeDetail) because we need to operate on EmployeeDetail Model only and finally click on the Add button to generate a view according to our configuration. After adding, your ListOfEmployee view will be created.
Following is the code snippet of ListOfEmployee.cshtml view that is generated
@model IEnumerable<MVCDemo.Models.EmployeeDetail>
@{
ViewBag.Title = "ListOfEmployee";
}
<h2>ListOfEmployee</h2>
<p>
@Html.ActionLink("Create New", "Create")
</p>
<table>
<tr>
<th>
@Html.DisplayNameFor(model => model.EmpID)
</th>
<th>
@Html.DisplayNameFor(model => model.Name)
</th>
<th>
@Html.DisplayNameFor(model => model.Address)
</th>
<th>
@Html.DisplayNameFor(model => model.Age)
</th>
<th>
@Html.DisplayNameFor(model => model.Salary)
</th>
<th>
@Html.DisplayNameFor(model => model.worktype)
</th>
<th></th>
</tr>
@foreach (var item in Model) {
<tr>
<td>
@Html.DisplayFor(modelItem => item.EmpID)
</td>
<td>
@Html.DisplayFor(modelItem => item.Name)
</td>
<td>
@Html.DisplayFor(modelItem => item.Address)
</td>
<td>
@Html.DisplayFor(modelItem => item.Age)
</td>
<td>
@Html.DisplayFor(modelItem => item.Salary)
</td>
<td>
@Html.DisplayFor(modelItem => item.worktype)
</td>
<td>
@Html.ActionLink("Edit", "Edit", new { /* id=item.PrimaryKey */ }) |
@Html.ActionLink("Details", "Details", new { /* id=item.PrimaryKey */ }) |
@Html.ActionLink("Delete", "Delete", new { /* id=item.PrimaryKey */ })
</td>
</tr>
}
</table>
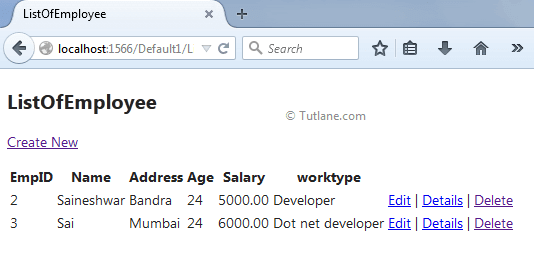
In the same way, you can create all views which you required. It’s not mandatory to go through this process, but using this feature can save development time. Now run our listofemployee view that will be like as shown below.
Finally, we completed the understanding view scaffolding templates in asp.net mvc application.