Here we will learn the HTML helpers in asp.net mvc razor view, types of HTML helpers in asp.net mvc, and basic HTML helper controls in asp.net, strongly-typed HTML helpers in asp.net mvc, and how to create HTML helpers in asp.net mvc application with example.
Generally, in asp.net mvc we use HTML helpers in a view to render HTML content. In asp.net mvc html helper is a method that helps us to return html content as a string.
In any web application, the basic thing is to render html as output. In .NET, we have ASP.NET Webforms and ASP.NET MVC frameworks to render HTML, but they render things in different ways.
In ASP.NET Webforms, we drag and drop the control on Form, and in code behind the .cs file, we will bind data to server controls to display html content on the page. In ASP.NET MVC, we have only HTML Controls to display content on the page.
If you came from an ASP.NET Webforms development background, you would think ASP.NET Webforms are better when compared with ASP.NET MVC because here you need to write the bulk of HTML that will get rendered in the browser, and writing the whole html will make developers a bit crazy. To solve this problem, ASP.NET MVC came up with HTML Helpers, who will help us render html in the browser. The HTML helpers and server controls both are used to render html on the browser.
If we use HTML helper in asp.net mvc applications, it won't maintain any ViewState, and the loading time of the website will reduce, and page performance will increase drastically. In asp.net mvc razor view, we have a different type of HTML helpers available those are
The following is the list of basic html helpers available in asp.net mvc.
The following are the list of strongly type html helpers available in asp.net mvc.
Let's have a simple example to see how to use basic helper controls in asp.net mvc. For this example, we need to create the following items in our asp.net mvc application.
Let's start with adding Controller and name it as UserController for that right click on Controllers folder à select Add à click on controller à Give name as UserController and select template as Empty MVC Controller and click add. Once our controller is created, that will be as shown below.
using System;
using System.Collections.Generic;
using System.Linq;
using System.Web;
using System.Web.Mvc;
namespace Tutorial5.Controllers
{
public class UserController : Controller
{
//
// GET: /User/
public ActionResult UserDetails()
{
return View();
}
}
}
We will create a View with the name UserDetails for that right click on UserController à select Add View and name as UserDetails and click Add. Once we add a view, please open it and use all Basic HTML helpers inside that view like as shown below.
@{ Layout = null;}
<!DOCTYPE html>
<html>
<head>
<meta name="viewport" content="width=device-width"/>
<h2>UserDetails</h2>
</head>
<body>
<div>
<table style="width: 100px; border: 1px;">
@using (Html.BeginForm())
{
<tr>
<td>Textbox</td>
<td>@Html.TextBox("UserName")</td>
</tr>
<tr>
<td>TextArea</td>
<td>@Html.TextArea("UserAddress")</td>
</tr>
<tr>
<td>Password</td>
<td>@Html.Password("UserPassword")</td>
</tr>
<tr>
<td>Hidden field</td>
<td>@Html.Hidden("UserID")</td>
</tr>
<tr>
<td>CheckBox</td>
<td>@Html.CheckBox("Check")</td>
</tr>
<tr>
<td>RadioButton</td>
<td style="width: 20px;">@Html.RadioButton("gender", "Male", true)Male</td>
<td style="width: 20px;">@Html.RadioButton("gender", "Female", true)Female</td>
</tr>
<tr>
<td>DropDownList</td>
<td>@Html.DropDownList("DrpCountry", new List<SelectListItem> {
new SelectListItem { Text = "select", Value = "0" } ,
new SelectListItem { Text = "India", Value = "1" },
new SelectListItem { Text = "USA", Value = "2" }
})</td>
</tr>
<tr>
<td>ListBox</td>
<td>@Html.ListBox("ListName", new List<SelectListItem> {
new SelectListItem { Text = "One", Value = "1" },
new SelectListItem { Text = "Two", Value = "2" },
new SelectListItem { Text = "Three", Value = "3" }
})</td>
</tr>
<tr>
<td>DisplayName</td>
<td>@Html.DisplayName("DisplayName")</td>
</tr>
<tr>
<td>Editor</td>
<td>@Html.Editor("EditID")</td>
</tr>
}
</table>
</div>
</body>
</html>
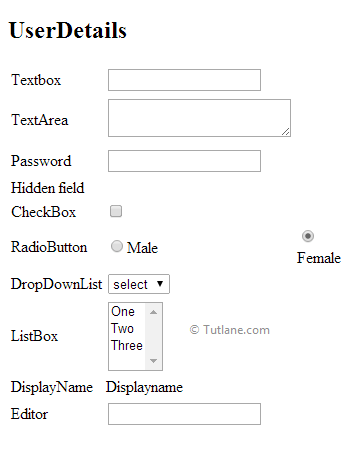
If you observe above code we used all Basic HTML helper controls. Generally our basic html helper controls syntaxes like as shown below.
The following are syntaxes of using basic html helper controls in the asp.net mvc application.
Textbox - @Html.TextBox("UserName")
TextArea - @Html.TextArea("UserAddress")
Password - @Html.Password("UserPassword")
Hidden field - @Html.Hidden("UserID")
Checkbox - @Html.CheckBox("Check")
Radiobutton - @Html.RadioButton("gender", "Male", true)Male
DropdownList - @Html.DropDownList("DrpCountry", new List<SelectListItem> {
new SelectListItem { Text = "select", Value = "0" } ,
new SelectListItem { Text = "India", Value = "1" },
new SelectListItem { Text = "USA", Value = "2" }
})
Listbox - @Html.ListBox("ListName", new List<SelectListItem> {
new SelectListItem { Text = "One", Value = "1" },
new SelectListItem { Text = "Two", Value = "2" },
new SelectListItem { Text = "Three", Value = "3" }
})
DisplayName - @Html.DisplayName("Displayname")
Editor - @Html.Editor("EditID")
Now, if you run the above code, we will get a basic HTML helper result like as shown below.
Now we will learn strongly type HTML helpers in asp.net mvc razor.
Let’s have a simple example to use strongly type helper controls in asp.net mvc. To use strongly type html helpers in asp.net mvc example, we need to create a model, controller, and view.
Now we will create a model in our asp.net mvc application for that right-click on Models Folder à Select Add à then select Class à new pop-up will open in that select class, and give name as UserModel and click Add button. Now open the UserModel file and write the code like as shown below.
using System;
using System.Collections.Generic;
using System.Linq;
using System.Web;
using System.Web.Mvc;
namespace Tutorial5.Models
{
public class UserModel
{
public int UserID { get; set; }
public string UserName { get; set; }
public string UserAge { get; set; }
public string UserAddress { get; set; }
public string UserMobileno { get; set; }
public bool Usergender { get; set; }
public int CheckID { get; set; }
public List<SelectListItem> listdropdown { get; set; } // for dropdownlist
public IEnumerable<Student> listboxdata { get; set; } //for Listbox
public string[] Listboxid { get; set; } //for Listbox
}
public class Student// For ListBox
{
public string Id { get; set; }
public string Name { get; set; }
}
}
If we observe the above code, we created 2 classes. The First class (UserModel) is used for binding all Textbox and Dropdownlist related controls, and also we created a list of students inside that will contain a list of all students in UserModel. The Second class (Student) is used for binding Listbox in which I took ID and Name, which will contain multiple data inside that for binding Listbox.
Let's create a new controller and name it as UserStronglyController. For that, right-click on the Controllers folder à select Add à click on controller à Give name as UserStronglyController and select template as Empty MVC Controller and click add. Now open our controller UserStrongController and write the code like as shown below.
using System;
using System.Collections.Generic;
using System.Linq;
using System.Web;
using System.Web.Mvc;
using Tutorial5.Models;
namespace Tutorial5.Controllers
{
public classUserStronglyController : Controller
{
[HttpGet] //decorating with http attributes
public ActionResult UserStronglyDetails()
{
UserModel u = new UserModel();
u.listdropdown = new List<SelectListItem>(){ // Filling Dropdownlist with data
new SelectListItem{Text ="select" , Value="0"},
new SelectListItem{Text ="one" , Value="1"},
new SelectListItem{Text ="two" , Value="2"},
new SelectListItem{Text ="three" , Value="3"}
};
u.listboxdata = new List<Student>(){ // Filling listbox with data
new Student{Name ="select" , Id="0"},
new Student{Name ="one" , Id="1"},
new Student{Name ="two" , Id="2"},
new Student{Name ="three" , Id="3"}
};
return View(u);
}
}
}
In the controller, we created an object of Model class (UserModel) and filled data in this list, which we have created for binding Dropdownlist and Listbox, and in last, we are returning the Model.
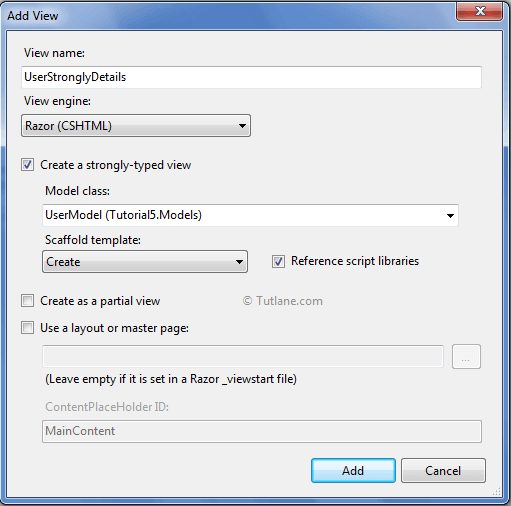
After completing the controller, we will create a View with the name UserStronglyDetails and use strongly-typed HTML helpers inside that view. For that, we need to use the Scaffolding technique. To add view, right-click inside the controller, a new dialog will popup à From that popup dialog, select Model class as UserModel and select Scaffold template as Create like as shown below.
It will generate the code of all controls we need to configure according to our needs. Here is the view which contains all strongly type HTML Helpers Controls.
@model Tutorial5.Models.UserModel
@{
Layout = null;
}
<!DOCTYPE html>
<html>
<head>
<meta name="viewport" content="width=device-width"/>
<title>UserStronglyDetails</title>
</head>
<body>
<script src="~/Scripts/jquery-1.7.1.min.js"></script>
<script src="~/Scripts/jquery.validate.min.js"></script>
<script src="~/Scripts/jquery.validate.unobtrusive.min.js"></script>
@using (Html.BeginForm())
{
@Html.ValidationSummary(true)
<fieldset>
<legend>UserModel</legend>
<div class="editor-label">
@Html.LabelFor(model => model.UserID)
</div>
<div class="editor-field">
@Html.HiddenFor(model => model.UserID)
@Html.ValidationMessageFor(model => model.UserID)
</div>
<div class="editor-label">
@Html.LabelFor(model => model.UserName)
</div>
<div class="editor-field">
@Html.TextBoxFor(model => model.UserName)
@Html.ValidationMessageFor(model => model.UserName)
</div>
<div class="editor-label">
@Html.LabelFor(model => model.UserAge)
</div>
<div class="editor-field">
@Html.TextAreaFor(model => model.UserAge)
@Html.ValidationMessageFor(model => model.UserAge)
</div>
<div class="editor-label">
@Html.LabelFor(model => model.UserAddress)
</div>
<div class="editor-field">
@Html.PasswordFor(model => model.UserAddress)
@Html.ValidationMessageFor(model => model.UserAddress)
</div>
<div class="editor-label">
@Html.LabelFor(model => model.UserMobileno)
</div>
<div class="editor-field">
@Html.EditorFor(model => model.UserMobileno)
@Html.ValidationMessageFor(model => model.UserMobileno)
</div>
<div class="editor-label">
@Html.Display("Checkbox")
</div>
<div class="editor-label">
@Html.LabelFor(model => model.CheckID)
</div>
<div class="editor-label">
@Html.Display("RadioButton")
</div>
<div class="editor-field">
@Html.RadioButtonFor(m => m.CheckID, true, new { @checked = "checked" })
</div>
<div class="editor-label">
@Html.LabelFor(model => model.Usergender)
</div>
<div class="editor-field">
@Html.CheckBoxFor(m => m.Usergender)
</div>
<div class="editor-label">
@Html.Display("Listbox")
</div>
<div class="editor-field">
@Html.ListBoxFor(x => x.Listboxid, new SelectList(Model.listboxdata, "Id", "Name"))
</div>
<br/>
<div class="editor-label">
@Html.Display("DropDownList")
</div>
<div class="editor-field">
@Html.DropDownListFor(m => m.UserID, Model.listdropdown)
</div>
<p>
<input type="submit" value="Create"/>
</p>
</fieldset>
}
<div>
@Html.ActionLink("Back to List", "Index")
</div>
</body>
</html>
If you observe above code we used Strongly Type Html Helper Controls. Generally our strongly type html helper controls syntaxes like as shown below
Following are the syntaxes of using strongly type html controls in asp.net mvc application
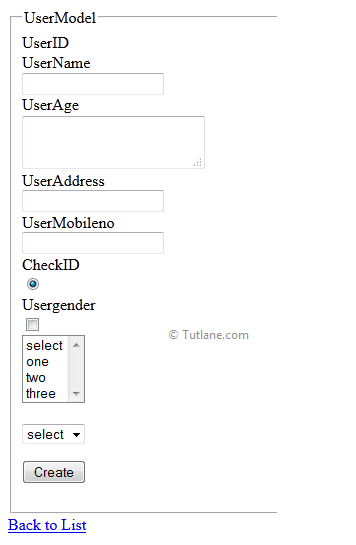
Now run the application to see the output of strongly-typed HTML helpers that will be as shown below.
Finally, we finished working with basic Html Helper Controls and strongly typed HTML controls asp.net mvc application.