Here we will learn what is Ajax helper in asp.net mvc and how to use Ajax helper with asp.net mvc. Let’s begin with the words AJAX; AJAX stands for Asynchronous JavaScript and XML.
In today's modern era, people want rich web applications. For developing this kind of application, we need to use AJAX in one or another way. Using ajax helpers in asp.net mvc, we can send data to a server in an asynchronous way without postbacks that will make our applications interactive, easy to use, and make end-users happy.
Using AJAX, we can update the partial part of the view without posting the entire page to the server. Here we will see how to use AJAX helper in asp.net mvc to submit forms and use the AJAX action link to invoke the action method asynchronously by using JavaScript. Before starting with the demo on AJAX helper, let's look at various properties of Ajax Options.
There might be a question what are Ajax Options?
We need to set these options for running Ajax scripts in an ASP.NET MVC application.
There are 12 properties of AjaxOptions. Below you will see the Metadata of AjaxOptions class.
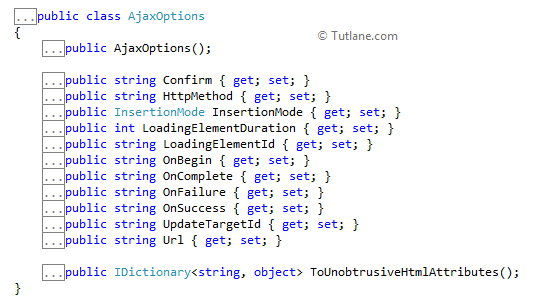
Let’s have a look in detail at all these AjaxOptions.
Confirm - This property display a confirmation box in which you will see the ok and cancel button if you click on the ok button after that Ajax request is made. This confirmation box is displayed before making the AJAX request.
HttpMethod - This property is used while making an Ajax request, GET or POST by default; this value is set to POST.
InsertionMode - There are 3 insertion modes ("InsertAfter", "InsertBefore", "Replace"). The default value is "Replace”. This specifies how the data response will be retrieved from the server is inserted into the target DOM element.
LoadingElementId - While AJAX request is processing, if we want to display Progress bar or Loader, then we can use this Property.
LoadingElementDuration - By setting this property, we can control the duration of LoadingElementId (Progress bar or Loader duration) for how much time it must be displayed.
UpdateTargetId - By setting UpdateTargetId of HTML elements the data from server will be added to this HTML element.
Url - which controllers Action Method to be called on while making Ajax Request is set here.
OnBegin - This AjaxOptions is called before sending Ajax call.
OnComplete - This AjaxOptions is called when Ajax call completed.
OnFailure - this AjaxOptions is called when Ajax call fails.
OnSuccess - This AjaxOptions is Ajax request completes successfully and happens before OnComplete.
After understanding, let’s move forward with creating an application in asp.net mvc and add AJAX functionally. We will create a basic form and submit the form in AJAX to implement all AjaxOptions in it.
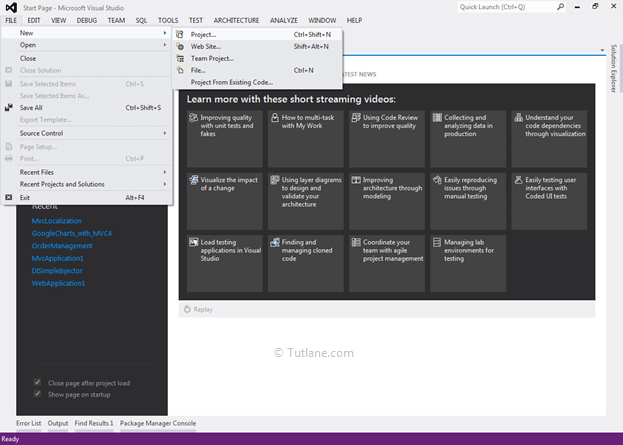
Let's start with creating a new asp.net mvc 4 application for that Open visual studio à Go to File à Select New à Select Project.
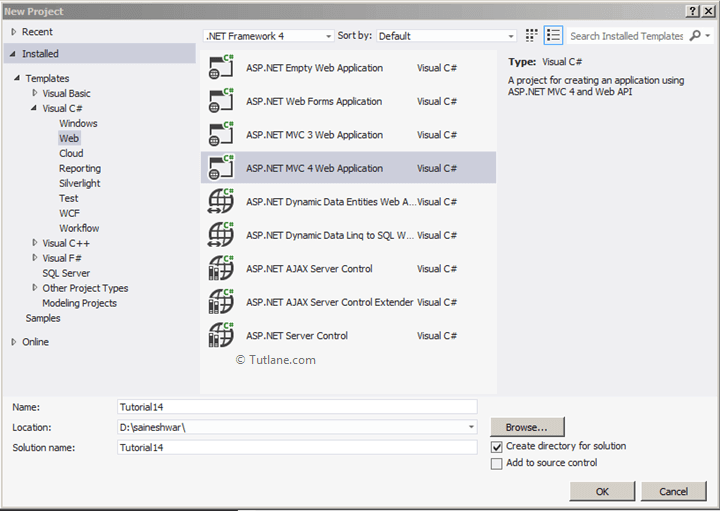
After that, you will see a new dialog for selecting your Template and Project type. From Templates, select Visual C# à inside that select Web and then project type select ASP.NET MVC 4 Web Application, and here we are giving the name as “Tutorial14” then finally click on OK button.
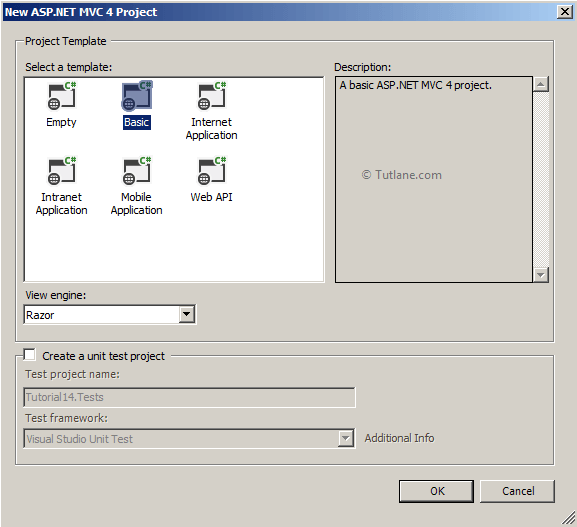
After naming and click on the OK button, a new dialog will pop up for selecting a template in that Select Basic template and set view engine as Razor.We will not create Unit testing for this project; hence, do not check this option and finally click OK like as shown below.
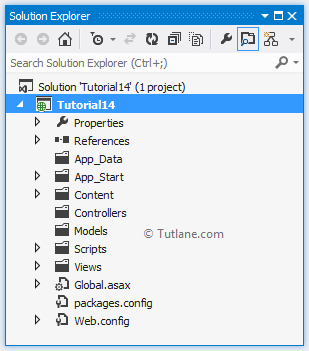
After selecting all options, click the OK button our Project will create like as shown below.
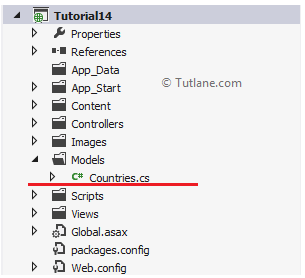
After creating a project, let’s add a Model with the name Countries. To add a new model file, open Solution Explorer à right-click the Models folder à Select Add à then select Class. Now give a name to the class as Countries and finally click on Add button to create Model once we finish adding a new model file that will be like as shown below.
Now open the countries model file and add properties like as shown below.
publicclassCountries
{
[Key]
public int CountriesID { get; set; }
public string CountriesName { get; set; }
}
After adding the Countries Model now, we will use the Code First Approach for accessing the database. For that, we are going to add class DbconnectionContext which will be inheriting from DbContext.
Adding Context class
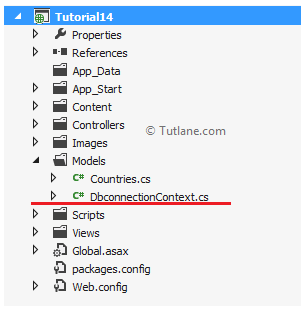
For adding context class In Solution Explorer, right-click the Models folder à Select Add à then select Class à Name the class DbconnectionContext. After adding a class that will be like, as shown below.
Now, open class DbconnectionContext file and Inherit from DbContext Class after this step in DbconnectionContext constructor, we will call base class (DbconnectionContext) and Provide Connection String in it.
using System;
using System.Collections.Generic;
using System.Data.Entity;
using System.Linq;
using System.Web;
namespace Tutorial14.Models
{
public class DbconnectionContext : DbContext
{
public DbconnectionContext()
: base("DefaultConnection")
{
}
public DbSet<Countries> Countries { get; set; }
}
}
We will add a connection string in web.config because we need to tell it where to create the Database.
<connectionStrings>
<add name="DefaultConnection" providerName = "System.Data.SqlClient" connectionString="data source=SAI-PC; initial catalog=OrderDB; persist security info=True; user id=sa; password=Pass$123; App=EntityFramework" />
</connectionStrings>
After completion of database part now let’s move towards adding Controller.
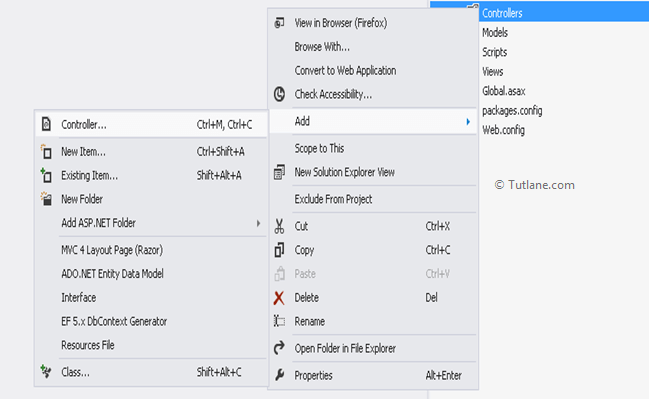
To add controller, right-click on the Controller folder, select Add from the list, and select controller.
After selecting the controller, a new dialog will pop up with the name Add Controller like as shown below.
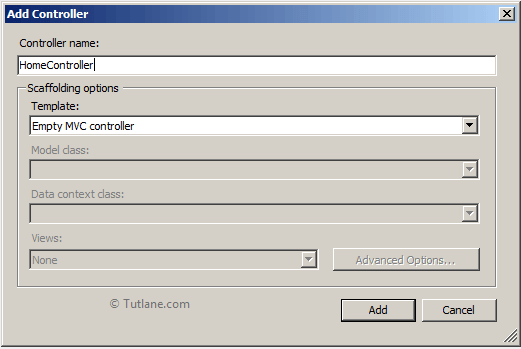
Now let’s name the controller to HomeController, and in the template, we will select the Empty MVC controller. Finally, click on the Add button to Create HomeController once we add a controller that will contain code like as shown below.

After adding HomeController, you will see the Index Action Method created by default. Now let’s add 2 Action Method with the name AddCountries this action method we will call using AjaxOptions.
[HttpPost]
public ActionResult AddCountries(Countries objCountries)
{
if (Request.IsAjaxRequest())
{
using (DbconnectionContext obj = newDbconnectionContext())
{
obj.Countries.Add(objCountries);
obj.SaveChanges();
}
}
return View();
}
[HttpGet]
public ActionResult AddCountries()
{
return View();
}
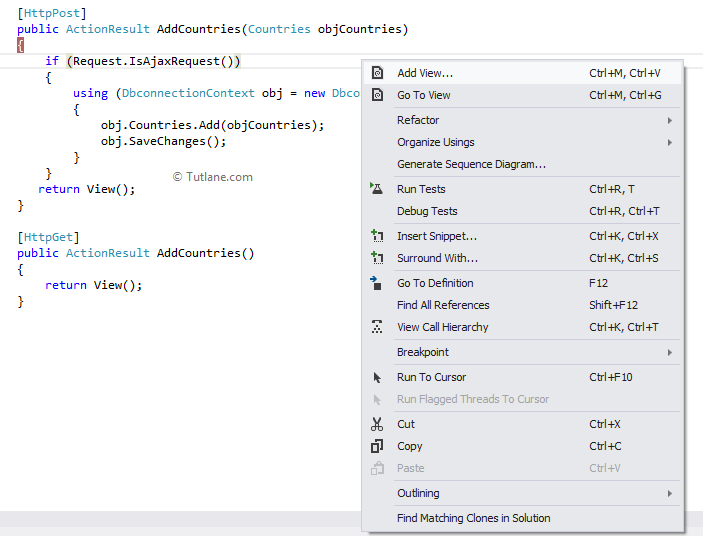
After adding the Action Method, it’s time to add View.
To add View, right-click inside Controller Action Method (AddCountries), select option Add View, as shown below.
After selecting the Add View option, a New Wizard will pop up with Name (Add View). It will have View Name the Same name as Action Method inside which you right-click to add View. In this example, we will create a Strongly-Typed view for that we check this option, and in Model class, we selected the Countries model class.
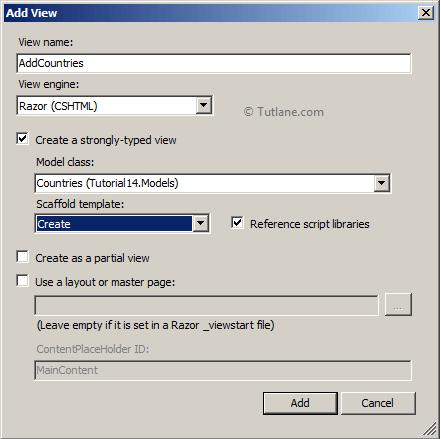
After selecting the required options, click on the Add button. After that, a View will be created inside the Views folder, and in that, we will have a folder with the name of the controller inside that our view will be created. Following is the code snippet of our newly created view.
@model Tutorial14.Models.Countries
@{
Layout = null;
}
<!DOCTYPE html>
<html>
<head>
<meta name="viewport" content="width=device-width"/>
<title>AddCountries</title>
</head>
<body>
<script src="~/Scripts/jquery-1.7.1.min.js"></script>
<script src="~/Scripts/jquery.validate.min.js"></script>
<script src="~/Scripts/jquery.validate.unobtrusive.min.js"></script>
@using (Html.BeginForm())
{
@Html.ValidationSummary(true)
<fieldset>
<legend>Countries</legend>
<div class="editor-label">
@Html.LabelFor(model => model.CountriesName)
</div>
<div class="editor-field">
@Html.EditorFor(model => model.CountriesName)
@Html.ValidationMessageFor(model => model.CountriesName)
</div>
<p>
<input type="submit" value="Create"/>
</p>
</fieldset>
}
<div>
@Html.ActionLink("Back to List", "Index")
</div>
</body>
</html>
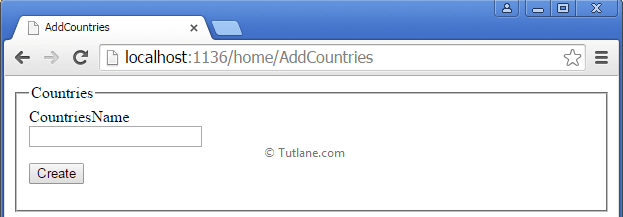
Now save your application and RUN then access URL like "http://localhost:####/home/AddCountries" that will be like as shown below.
Just enter Countries Name and click on the Create button. As you click, it will create a database with the name OrderDB and inside, that will create a table because we are using the Code First approach of Entity framework. Following is database OrderDB which is created after running Application (Code First).
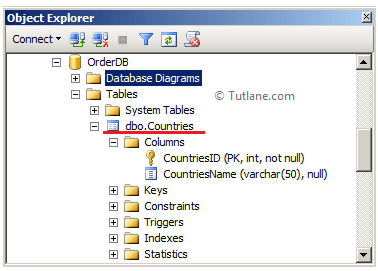
Following is the table which is created [Countries].
After that, while adding countries, you might have seen page flickers. This effect is due to the entire page is posted to the server. Now let’s make a form Ajaxified.
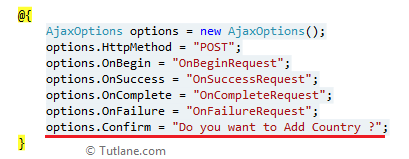
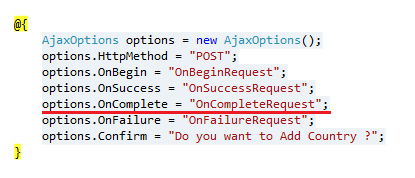
The first thing we are going to add AjaxOptions in asp.net mvc application. Here we will set 6 AjaxOptions, and to post the form to a server, we assigned HttpMethod to "POST". And all remaining AjaxOptions are assigned with the JavaScript function; you can see the following code snippet; it will give an idea.
@{
AjaxOptions options = new AjaxOptions();
options.HttpMethod = "POST";
options.OnBegin = "OnBeginRequest";
options.OnSuccess = "OnSuccessRequest";
options.OnComplete = "OnCompleteRequest";
options.OnFailure = "OnFailureRequest";
options.Confirm = "Do you want to Add Country ?";
}
After adding Ajax options, we will create a JavaScript function for assign to AjaxOptions.
<script type="text/javascript">
function OnBeginRequest() {
alert('On Begin');
}
function OnCompleteRequest() {
alert('On Completed');
}
function OnSuccessRequest() {
alert('On Success');
}
function OnFailureRequest() {
alert('On Failure');
}
</script>After adding Function, let’s make changes in the form tag of AddCountries view. We are going to modify the form tag as given below.
Normal Tag
@using (Html.BeginForm("AddCountries", "Home"))
{
}
Ajax Form tag
In the Ajax form tag, we need to pass AjaxOptions in which we have to assign JavaScript function.
@using (Ajax.BeginForm ("AddCountries", "Home", options))
{
}
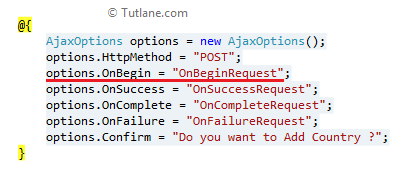
Following is the complete Markup of AddCountries view after adding Ajax options.
@model Tutorial14.Models.Countries
@{
Layout = null;
}
<!DOCTYPE html>
<html>
<head>
<meta name="viewport" content="width=device-width"/>
<title>AddCountries</title>
</head>
<body>
<script src="~/Scripts/jquery-1.7.1.min.js"></script>
<script src="~/Scripts/jquery.validate.min.js"></script>
<script src="~/Scripts/jquery.validate.unobtrusive.min.js"></script>
<script type="text/javascript">
function OnBeginRequest() {
alert('On Begin');
}
function OnCompleteRequest() {
alert('On Completed');
}
function OnSuccessRequest() {
alert('On Success');
}
function OnFailureRequest() {
alert('On Failure');
}
</script>
@{
AjaxOptions options = new AjaxOptions();
options.HttpMethod = "POST";
options.OnBegin = "OnBeginRequest";
options.OnSuccess = "OnSuccessRequest";
options.OnComplete = "OnCompleteRequest";
options.OnFailure = "OnFailureRequest";
options.Confirm = "Do you want to Add Country ?";
}
@using (Ajax.BeginForm("AddCountries", "Home", options))
{
@Html.ValidationSummary(true)
<fieldset>
<legend>Countries</legend>
<div class="editor-label">
@Html.LabelFor(model => model.CountriesName)
</div>
<div class="editor-field">
@Html.EditorFor(model => model.CountriesName)
@Html.ValidationMessageFor(model => model.CountriesName)
</div>
<p><input type="submit" value="Create"/></p>
</fieldset>
}
</body>
</html>
After making changes in AddCountries views now save your application and run then access URL like "http://localhost:####/home/AddCountries".
Let’s enter a Countries name and click on the Create button. When we click on the Create button, the page started post backing the Action Method is not getting called. This is happening because we didn't add Unobtrusive Ajax reference to the page without adding Unobtrusive Ajax. We cannot use Ajax helper in asp.net mvc.
You may have a question what is Unobtrusive Ajax?
Unobtrusive Ajax is a way of separating JavaScript and Ajax from HTML Markup such that we can keep them clean, organize, and easy for maintenance.
For example, if we are using any date picker on a page, we will add many Ajax and JavaScript code on that page and make that page bulky. If we use Unobtrusive Ajax and JavaScript, we will add a reference to this file on Page and not write or render any JavaScript and Ajax on-page.
Let’s come back for adding Unobtrusive Ajax reference to the page in asp.net mvc.

Now to handle the request, we need to add "UnobtrusiveJavaScriptEnabled" as a key in the web.config file under the "<appSettings>" section, as shown below.
<appSettings>
<add key="webpages:Version" value="2.0.0.0" />
<add key="webpages:Enabled" value="false" />
<add key="PreserveLoginUrl" value="true" />
<add key="ClientValidationEnabled" value="true" />
<add key="UnobtrusiveJavaScriptEnabled" value="true" />
</appSettings>
After adding these now save your application and RUN.
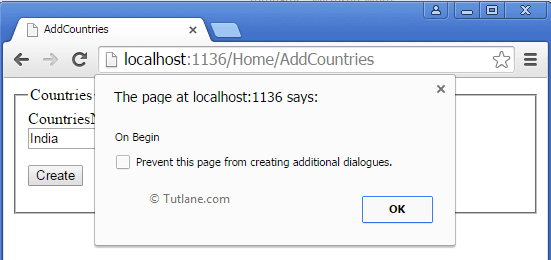
After running the application, enter Countries Name and click on the Create button. The first message will pop up that is Confirmation below is AjaxOptions that we have set.
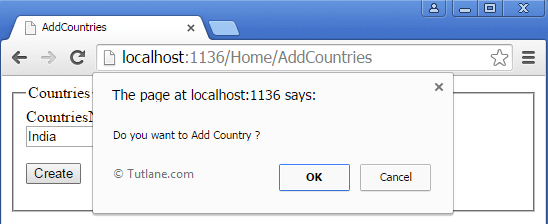
Following is the way we need to set the Confirm ajax helper option in asp.net mvc.
The second message will pop up, which is OnBegin below is the AjaxOptions that we have set.
Following is the way we need to set OnBegin ajax helper option in asp.net mvc.
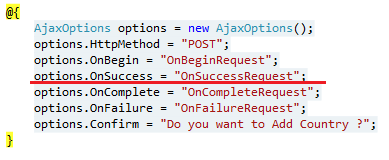
The Third Message will pop up, which is On Success; below is AjaxOptions that we have set.

Following is the way we need to set the ajax onSuccess helper option in asp.net mvc.
The fourth message will pop up, which is OnComplete below is AjaxOptions that we have set.

Following is the way we will set the ajax oncomplete method in asp.net mvc.
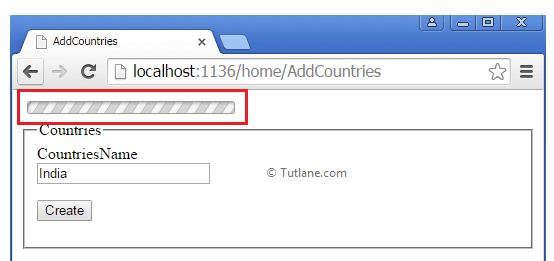
Let’s add some more Ajax options add Loader progress images as we submit the form and get hidden as we complete the process requests.
We are going to set the following Ajax options to display Ajax Loading images.
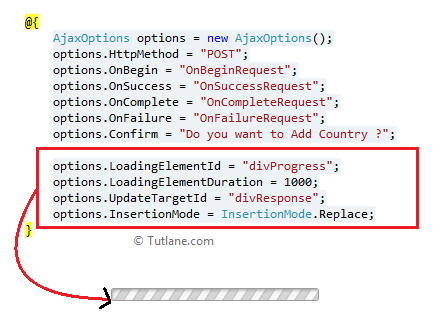
The first step is to set up an ajax loading image. We need to add a div and inside a loader gif image like as shown below code.
<div id="divProgress" style="display: none;">
<div class="modalBackground ajax-loader">
<img src="~/Images/ajax-loader.gif"/>
</div>
</div>
Second step is to set LoadingElementId which will be the div id (divProgress) which we have recently added.
options.LoadingElementId = "divProgress";
The third step is to set LoadingElementDuration, which is in milliseconds.
options.LoadingElementDuration = 1000;
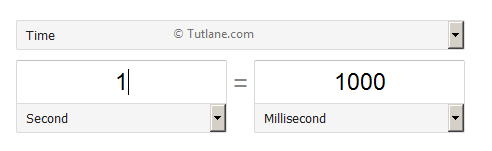
Generally, the LoadingElementDuration property gets or sets a value, in milliseconds, that controls the animation duration when showing or hiding the loading. As per the below, 1 second equals to 1000 milliseconds.
The fourth step is to set UpdateTargetId, which will be the div id (divResponse) in which we want server data to be added when we get in response.
<div id="divResponse">
</div>
Following is the ajax option we added to access this targedid
options.UpdateTargetId = "divResponse";
The fifth step is to set InsertionMode we are going to set it to replace.
options.InsertionMode = InsertionMode.Replace;
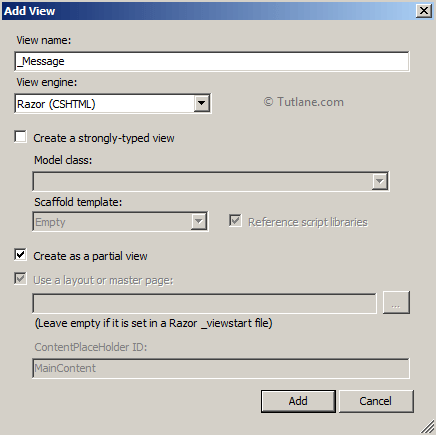
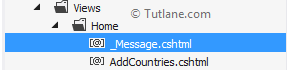
Now let’s add a partial view to AddCountries Action Method in Home Controller. For adding Partial View, right-click inside Action Method AddCountries and then select Add View Option. After that, the Add View dialog will pop up, we will name View as “_Message” and after that, going to check Create as a partial view options and finally click on the Add button.
After adding, it will get added in the Home folder, which is inside Views Folder like as shown below.
Now let’s add some mark up inside the “_Message” partial view like as shown below.
@{
Layout = null;
}
<!DOCTYPE html>
<html>
<head>
<meta name="viewport" content="width=device-width"/>
<title>Add Countries</title>
</head>
<body>
<div>
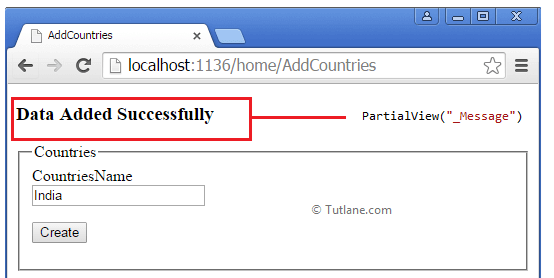
<h3>Data Added Successfully </h3>
</div>
</body>
</html>
And in the last step, I am going to change the return type of AddCountries Action Method from return View(); to return PartialView ("_Message");
[HttpPost]
public ActionResult AddCountries(Countries objCountries)
{
if (Request.IsAjaxRequest())
{
using (DbconnectionContext obj = new DbconnectionContext())
{
obj.Countries.Add(objCountries);
obj.SaveChanges();
}
}
return PartialView("_Message");
}
Now save and run the application with a URL like "http://localhost:####/home/AddCountries". After running the application, access your AddCountries page, enter Countries Name, and click on the Create button. As you click, you will see the Loader progress image, and after completing the request, it will get hired, and then your partial view message will be displayed there.
Following is the partial view, which is displayed after adding data.
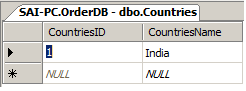
If we check table Countries, we can find records of whatever we created from asp.net mvc ajax helpers application like as shown below.
After completing the form using Ajax, let’s work with Ajax ActionLink (@Ajax.ActionLink) to get data from the database and insert the response in an HTML container.
The Ajax ActionLink (@Ajax.ActionLink) is similar to html ActionLink (@Html.ActionLink) but Ajax ActionLink send asynchronous request to Action Method and the response of this action Method can be used to update html elements ( UpdateTargetId = "divResponse") .
Let’s start with an example. For this, we added a new Action Method with Name ViewCountry in Home Controller, which returns a list of countries we added.
public ActionResult ViewCountry()
{
using (DbconnectionContext db = new DbconnectionContext())
{
List<Countries> list = db.Countries.ToList();
return PartialView("_CountryList", list);
}
}
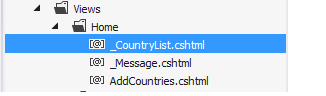
Let's add a Partial view to this ViewCountry Action Method. For adding Partial view, right-click inside Action Method, then select Add View from the list. A new dialog of Add View will popup then Enter View name “_CountryList” after selecting as View engine (Razor). We will create a strongly-typed view for that we will check this option, and in Model class, we will select Countries Model after selecting this. We are going to keep the Scaffolding template to Empty.

After adding Partial View, it will get added to Home Folder in View.
If you open this partial view, you will see an empty View with a tightly coupled Countries Model. Here we will modify the tightly coupled Model to take the IEnumerable list as input and use the Foreach loop to display data from collection one by one.
@model IEnumerable<Tutorial14.Models.Countries>
<table>
<tr>
<th>Countries ID</th>
</tr>
<tr>
<th>Countries Name</th>
</tr>
@foreach (var item in Model)
{
<tr>
<td>
@Html.DisplayFor(modelItem => item.CountriesID)
</td>
<td>
@Html.DisplayFor(modelItem => item.CountriesName)
</td>
</tr>
}
</table>
Adding another group of Ajax options for Ajax Action Link.
@{
AjaxOptions objAjaxOptions = new AjaxOptions();
objAjaxOptions.HttpMethod = "POST";
objAjaxOptions.UpdateTargetId = "divshowResponse";
objAjaxOptions.InsertionMode = InsertionMode.Replace;
objAjaxOptions.LoadingElementId = "divProgress";
}
After adding Ajax options now, we will add Ajax Action Link and pass this Ajax option to this helper method. Here we will add Ajax ActionLink (@Ajax.ActionLink) to your Main page (AddCountries) view it as similar as we configured @Ajax.BeginForm helper.
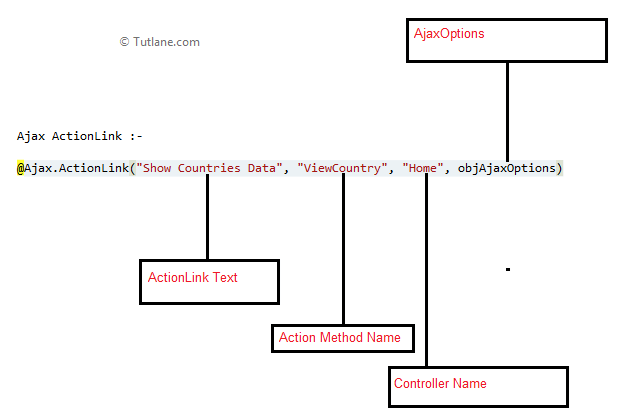
@Ajax.ActionLink("Show Countries Data", "ViewCountry", "Home", objAjaxOptions)
Following is the detailed explanation of ajax actionlink.
Now we will add the divProgress HTML element, which is used for display loading image when we click on ActionLink (LoadingElementId) for display loading image. At the same time, it loads data from the server.
<div id="divProgress" style="display: none;">
<div class="modalBackground ajax-loader">
<img src="~/Images/ajax-loader.gif"/>
</div>
</div>Now we are going to add Html Element in which we are going populate data to receive as Response from server.
<div id="divshowResponse">
</div>
After adding html Elements now let’s have look on complete markup of AddCountries view how it look.
@model Tutorial14.Models.Countries
@{
Layout = null;
}
<!DOCTYPE html>
<html>
<head>
<meta name="viewport" content="width=device-width"/>
<title>AddCountries</title>
<script src="~/Scripts/jquery-1.7.1.min.js"></script>
<script src="~/Scripts/jquery.validate.min.js"></script>
<script src="~/Scripts/jquery.validate.unobtrusive.min.js"></script>
<script src="~/Scripts/jquery.unobtrusive-ajax.min.js"></script>
<script type="text/javascript">
function OnBeginRequest() {
alert('On Begin');
$("#divResponse").empty();
}
function OnCompleteRequest() {
alert('On Completed');
}
function OnSuccessRequest() {
alert('On Success');
}
function OnFailureRequest() {
alert('On Failure');
}
</script>
</head>
<body>
@{
AjaxOptions options = new AjaxOptions();
options.HttpMethod = "POST";
options.OnBegin = "OnBeginRequest";
options.OnSuccess = "OnSuccessRequest";
options.OnComplete = "OnCompleteRequest";
options.OnFailure = "OnFailureRequest";
options.Confirm = "Do you want to Add Country ?";
options.LoadingElementId = "divProgress";
options.LoadingElementDuration = 1000;
options.UpdateTargetId = "divResponse";
options.InsertionMode = InsertionMode.Replace;
}
<div id="divResponse">
</div>
@using (Ajax.BeginForm("AddCountries", "Home", options))
{
@Html.ValidationSummary(true)
<fieldset>
<legend>Countries</legend>
<div class="editor-label">
@Html.LabelFor(model => model.CountriesName)
</div>
<div class="editor-field">
@Html.EditorFor(model => model.CountriesName)
@Html.ValidationMessageFor(model => model.CountriesName)
</div>
<p>
<input type="submit" value="Create"/>
</p>
</fieldset>
}
@*--------------------------------------------------------------------------*@
@{
AjaxOptions objAjaxOptions = new AjaxOptions();
objAjaxOptions.HttpMethod = "POST";
objAjaxOptions.UpdateTargetId = "divshowResponse";
objAjaxOptions.InsertionMode = InsertionMode.Replace;
objAjaxOptions.LoadingElementId = "divProgress";
}
<br/>
Ajax ActionLink :-
@Ajax.ActionLink("Show Countries Data", "ViewCountry", "Home", objAjaxOptions)
<div id="divshowResponse">
</div>
<div id="divProgress" style="display: none;">
<div class="modalBackground ajax-loader">
<img src="~/Images/ajax-loader.gif"/>
</div>
</div>
</body>
</html>
Following is complete code snippet of Home Controller.
using System;
using System.Collections.Generic;
using System.Linq;
using System.Web;
using System.Web.Mvc;
using Tutorial14.Models;
namespace Tutorial14.Controllers
{
public class HomeController : Controller
{
public ActionResult Index()
{
using (DbconnectionContext obj = new DbconnectionContext())
{
List<Countries> Countries = obj.Countries.ToList();
}
return View();
}
[HttpPost]
public ActionResult AddCountries(Countries objCountries)
{
if (Request.IsAjaxRequest())
{
using (DbconnectionContext obj = new DbconnectionContext())
{
obj.Countries.Add(objCountries);
obj.SaveChanges();
}
}
return PartialView("_Message");
}
public ActionResult ViewCountry()
{
using (DbconnectionContext db = new DbconnectionContext())
{
List<Countries> list = db.Countries.ToList();
return PartialView("_CountryList", list);
}
}
[HttpGet]
public ActionResult AddCountries()
{
return View();
}
}
}
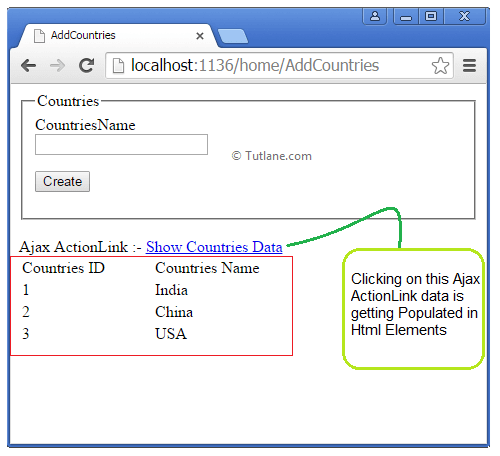
Now save Application and RUN then Access View AddCountries, which is under Home Controller. After rendering AddCountries, view it displaying Ajax ActionLink.

After clicking on Ajax ActionLink, it is going to Call (ViewCountry) Action Method. In ViewCountry Action Method, we will return Partial View and that Partial View data is getting Updated in the Html element (“divshowResponse”).
Finally, we completed learning Ajax Helpers in asp.net mvc with examples.