The Partial Views in asp.net mvc razor is similar to user control in ASP.NET Webforms. In the asp.net mvc web application, if we want to display some similar part of the content in various parts of the web application, we need to create a Partial View for that part. Generally, partial can be reusable in multiple views, and it helps us to reduce code duplication.
Here we will learn a partial view with a simple example. For that, create the following items in your application.
1) Creating Model (CarModel)
2) Creating Controller ( CarController)
3) Creating a Partial view (Child)
4) Creating View (Parent)
Now we will create a model (CarModel) in our asp.net mvc application for that right click on Models Folder à Select Add à then select Class à now new pop up will open in that select class and give name as CarModel and click Add button. Now open the CarModel file and write the code like as shown below.
using System;
using System.Collections.Generic;
using System.Linq;
using System.Web;
namespace Tutorial5.Models
{
public class CarModel
{
public int CarID { get; set; }
public string CarType { get; set; }
public int CarPrice { get; set; }
public string CarColor { get; set; }
public List<CarModel> Listcar { get; set; } // List of Car
}
}
After completing creating CarModel now, we will create a Controller for that right click on Controllers folder à select Add à click on controller à Give name as CarController and select template as Empty MVC Controller and click add.
In this controller, we will create an object of CarModel and assign value to it, and also we will add data to ListCar, which is a list of type Car, and then return a model. Now open our controller (CarController) and write the code like as shown below.
using System;
using System.Collections.Generic;
using System.Linq;
using System.Web;
using System.Web.Mvc;
using Tutorial5.Models;
namespace Tutorial5.Controllers
{
public class CarController : Controller
{
public ActionResult Index()
{
CarModel objcar = new CarModel();
objcar.CarID = 1;
objcar.CarColor = "Brown";
objcar.CarPrice = 20000;
objcar.CarType = "sporty";
List<CarModel> objlistcar = new List<CarModel>();
objlistcar.Add(objcar); // add item in list
objcar.Listcar = objlistcar; // assigning value to CarModel object
return View(objcar); // Returning model
}
}
}
After completion of creating CarController now, we will create a View.
To create a Partial view, right-click inside the controller action method, a new dialog will pop up with Name Add View to enter view name CarPartialView and select view engine as Razor. Here we will create a strongly-typed view; that's why we need to select the option Create a strongly-typed view and then in Model class give name as CarModel. Now select the Scaffold template as List and select Create as a partial view option because we will create a partial view. Once everything is done, click on the Add button. Our View options will be as shown below image.

After clicking on the Add button, the Scaffold template will generate code for us, and It will generate a list with the model we used to it that would be like as shown below.
@model IEnumerable<Tutorial5.Models.CarModel>
<table style="background-color: rosybrown; border:dashed;">
<tr>
<td colspan="3"><h2>Child View</h2></td>
</tr>
<tr>
<th>
@Html.DisplayNameFor(model => model.CarID)
</th>
<th>
@Html.DisplayNameFor(model => model.CarType)
</th>
<th>
@Html.DisplayNameFor(model => model.CarPrice)
</th>
<th>
@Html.DisplayNameFor(model => model.CarColor)
</th>
</tr>
@foreach (var item in Model)
{
<tr>
<td>
@Html.DisplayFor(modelItem => item.CarID)
</td>
<td>
@Html.DisplayFor(modelItem => item.CarType)
</td>
<td>
@Html.DisplayFor(modelItem => item.CarPrice)
</td>
<td>
@Html.DisplayFor(modelItem => item.CarColor)
</td>
</tr>
}
</table>
After completion of Creating Partial view, we have to create a View in which we have to render this Partial view
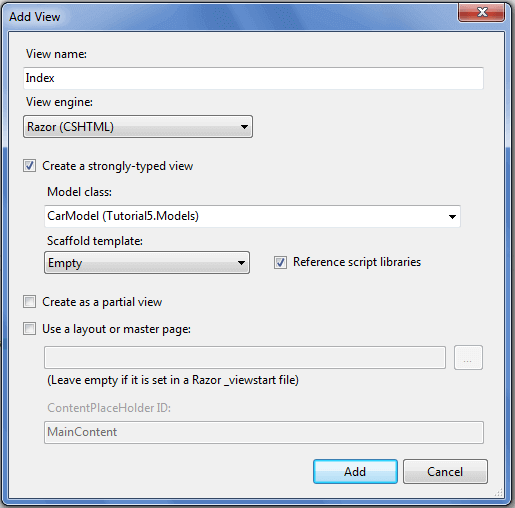
To create a view, right-click inside the controller action method, a new dialog will popup with Name Add View in that give view name Index and select View engine as Razor. Here we will create a strongly-typed view that why we need to select the option Create a strongly-typed view and then in Model class give name as CarModel. Now select Scaffold template as Empty and Uncheck the option Use Layout or Master Page lastly, click Add button like as shown below.
After clicking on the Add button, the Scaffold template will generate code for us. It will generate an Empty view with the model you had passed to it that will be like as shown below.
@model Tutorial5.Models.CarModel
@{
Layout = null;
}
<!DOCTYPE html>
<html>
<head>
<meta name="viewport" content="width=device-width"/>
<title>Index</title>
</head>
<body>
<div>
</div>
</body>
</html>
Now we have to render partial view inside Index view. For rendering view we are going to use Html Helper class that will be like as shown below
@Html.Partial("Partial View Name", "Model which is required")
Once we add a partial view inside of view, that will be like as shown below.
@model Tutorial5.Models.CarModel
@{
Layout = null;
}
<!DOCTYPE html>
<html>
<head>
<meta name="viewport" content="width=device-width"/>
<title>Index</title>
</head>
<body style="background-color:whitesmoke;">
<div>
@Html.Partial("CarPartialView", Model.Listcar)
</div>
</body>
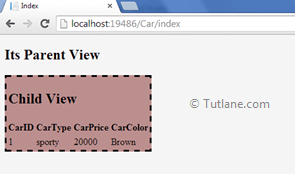
</html>Finally, run the application and check the output that will be as shown below. The outermost view is the Parent view, and the view with Brown color is a Partial view (Child view).