Here we will learn what is data annotations in asp.net mvc and how to use data annotations in asp.net mvc to perform model data validation with example.
In asp.net mvc data Annotations attribute is a simple rule that can be applied to Model to validate Model data.
The Data Annotations validation attributes are the simple to use just we need to apply this attribute to our model class fields and need to provide our error message then it will validate input and provide error message according to it. Some common Data Annotations validation are required fields like checking fields Range, StringLength etc.
DisplayName:
Provides a general-purpose attribute that lets you specify localizable strings to display. E.g
[DisplayName("StudentName")]
Required:
A value is required. E.g
DataType:
The data type annotation can be used to specify the data type for validation. E.g
StringLength:
Max. Length of array or string data allowed. E.g
[StringLength(50, ErrorMessage = "Only 50 character are allowed")]
DisplayFormat:
Specify the display format for a property like various formats for a Date property. E.g
Regular Expression:
Validate the value of a property by a specified Regular Expression pattern. E.g
Range:
Numeric range constraints for the data field value. E.g
Bind:
Specify fields to include or exclude when adding a parameter or form values to model properties. E.g
Compare:
The Compares property compares two properties. E.g
[DataType(DataType.Password)]
[Required(ErrorMessage = "Please enter password")]
public string Password { get; set; }
[Required(ErrorMessage = "Please enter ConfirmPassword")]
[DataType(DataType.Password)]
[Compare("Password", ErrorMessage = "Password not matching")]
public string ConfirmPassword { get; set; }
Key:
Denotes one or more properties that uniquely identify an entity.
[Key]
public int StudentID { get; set; }
Now let’s start with creating application
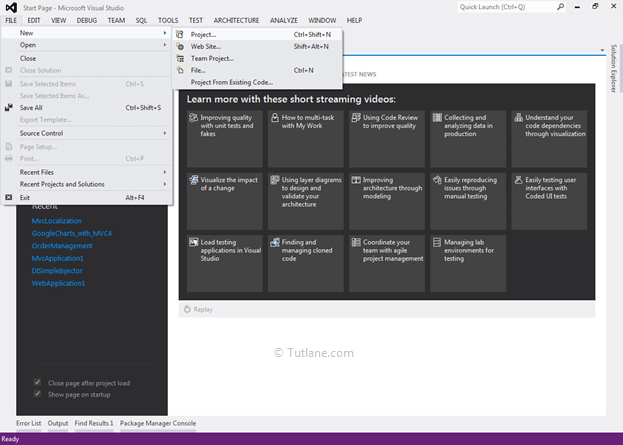
Let’s First create a Basic asp.net Mvc 4 application with name DataAnnotationValidation for that Open visual studio studio àGo to File àSelect New àSelect Project like as shown below
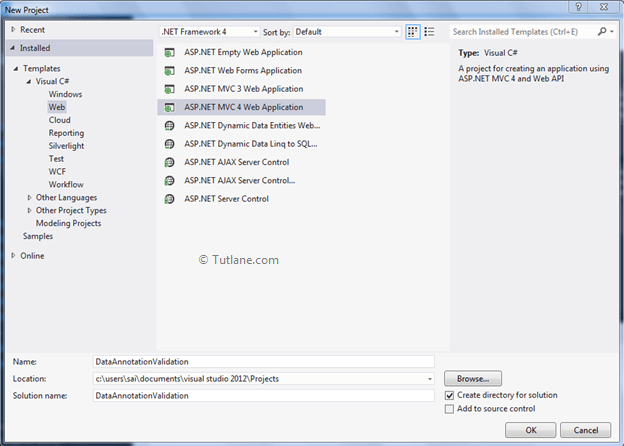
After that you will see new dialog will pop up for selecting your Template and Project type. From Templates select Visual C# àinside that select Web and then project type select ASP.NET MVC 4 Web Application and here we are giving name as “DataAnnotationValidation” then finally click on ok button
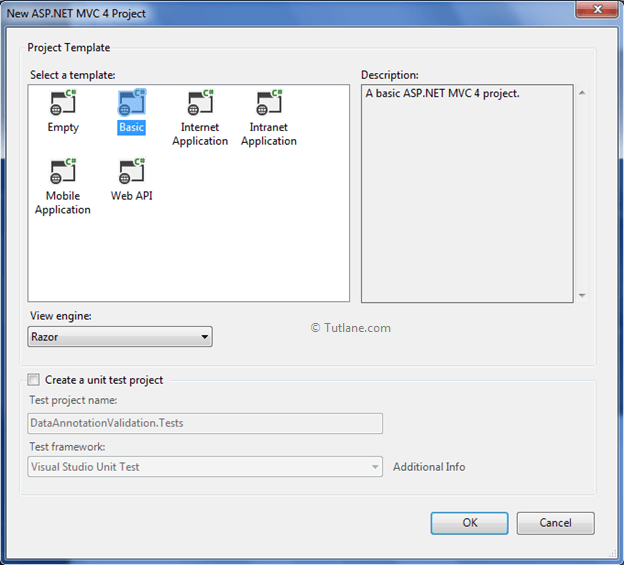
After naming it just click on OK. After that a new dialog will popup for selecting template. in that select Basic template and click ok.
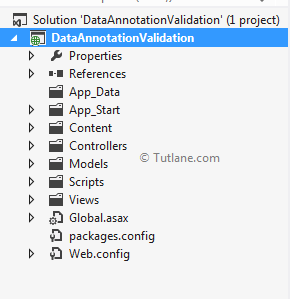
After creating application our project structure like as shown below
After creating application now lets work with Create Model.
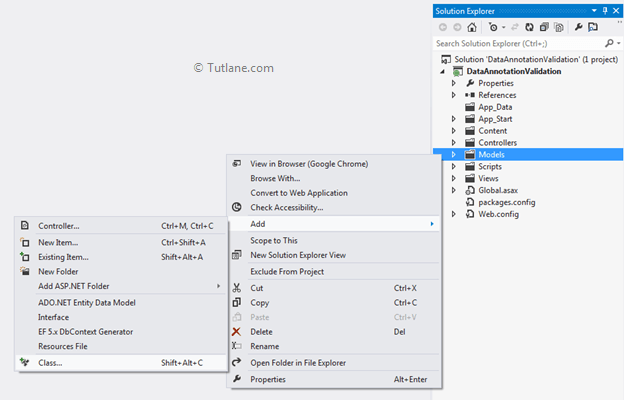
To perform this validation now let's start with creating a Model with Name Student. For adding Model just Right Click on Model àThen Select Add à inside that select Class.
After Clicking on class Add New item dialog will popup with class select and asking for class name here we are going to enter class name as “Student”
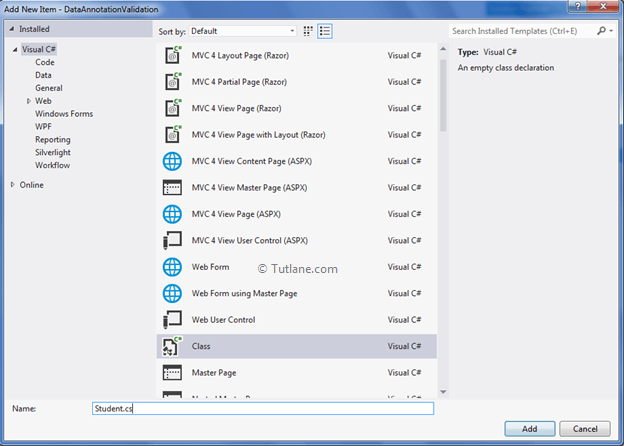
After entering class name click on Add button. A Student class is added to our project with some default code that will be like as shown below
using System;
using System.Collections.Generic;
using System.Linq;
using System.Web;
namespace DataAnnotationValidation.Models
{
public class Student
{
}
}
Now let’s add some Properties and Data Annotations to this class like as shown below
using System;
using System.Collections.Generic;
using System.ComponentModel;
using System.ComponentModel.DataAnnotations;
using System.Linq;
using System.Web;
using System.Web.Mvc;
namespace DataAnnotationValidation.Models
{
[Bind(Exclude = "StudentID")]
public class Student
{
[Key]
public int StudentID { get; set; }
[DisplayName("StudentName")]
[Required(ErrorMessage = "Enter Student Name")]
[StringLength(50, ErrorMessage = "Only 50 character are allowed")]
public string StudentName { get; set; }
[DisplayFormat(DataFormatString = "{0:dd.MM.yyyy}")]
[Required(ErrorMessage = "Please enter Date of Birth")]
public DateTime StudentDOB { get; set; }
[RegularExpression(@"[a-z0-9._%+-]+@[a-z0-9.-]+\.[a-z]{2,4}",
ErrorMessage = "Please enter Valid Email ID")]
[Required(ErrorMessage = "Please enter Student EmailID")]
public string StudentEmailID { get; set; }
[Range(5000, 15000, ErrorMessage = "Please enter valid range")]
[Required(ErrorMessage = "Please enter Student Fees")]
public decimal StudentFees { get; set; }
[Required(ErrorMessage = "Please enter Student Address")]
[StringLength(50, ErrorMessage = "Only 50 character are allowed")]
public string StudentAddress { get; set; }
[DataType(DataType.Password)]
[Required(ErrorMessage = "Please enter password")]
public string Password { get; set; }
[Required(ErrorMessage = "Please enter ConfirmPassword")]
[DataType(DataType.Password)]
[Compare("Password", ErrorMessage = "Password not matching")]
public string ConfirmPassword { get; set; }
}
}
After adding Properties and Data Annotations to this class now let’s add Controller
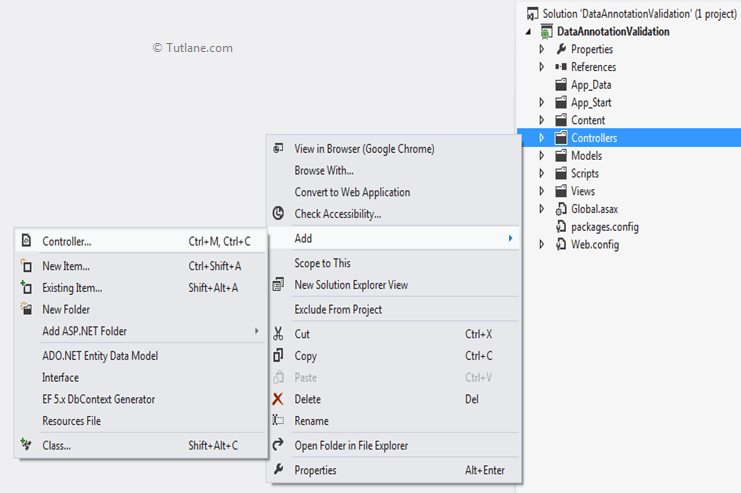
For adding Controller Just Right click on Controller Folder inside that select Add and then select Controller like as shown below
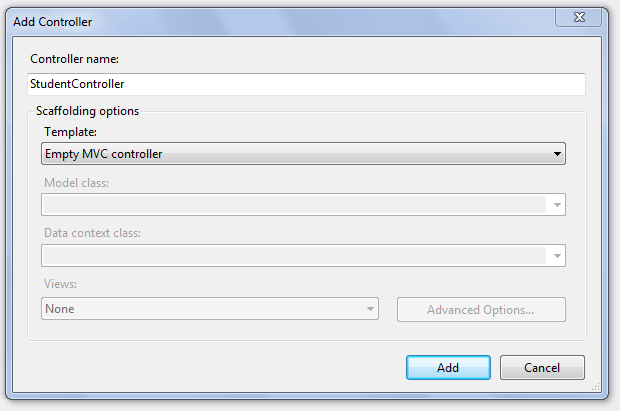
After clicking on Controller new dialog will popup with name Add Controller in that mention name as "StudentController" and select template as "Empty MVC Controller" like as shown below
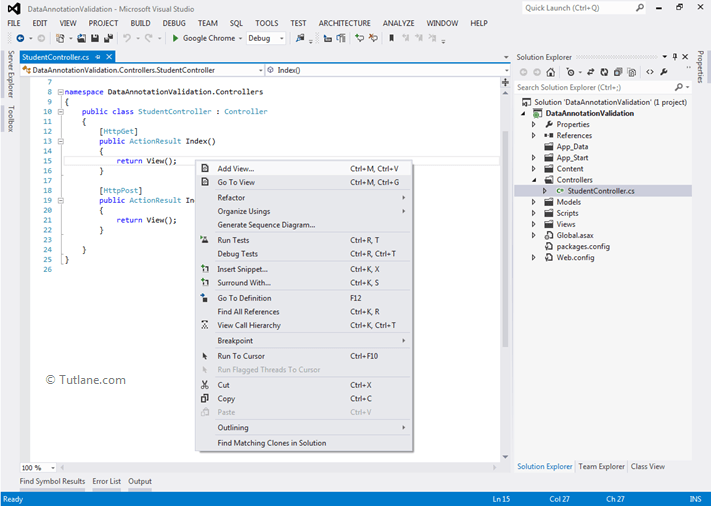
In Template select “Empty MVC controller” and finally click on Add button some default code is generated after adding a controller class. Here in this controller code we made some manual configuration by adding Action Selector [HttpGet], [HttpPost] with a New Action Method Index with Student model parameter as input.
using System;
using System.Collections.Generic;
using System.Linq;
using System.Web;
using System.Web.Mvc;
using DataAnnotationValidation.Models;
namespace DataAnnotationValidation.Controllers
{
public class StudentController : Controller
{
[HttpGet]
public ActionResult Index()
{
return View();
}
[HttpPost]
public ActionResult Index(Student objstudent)
{
return View();
}
}
}
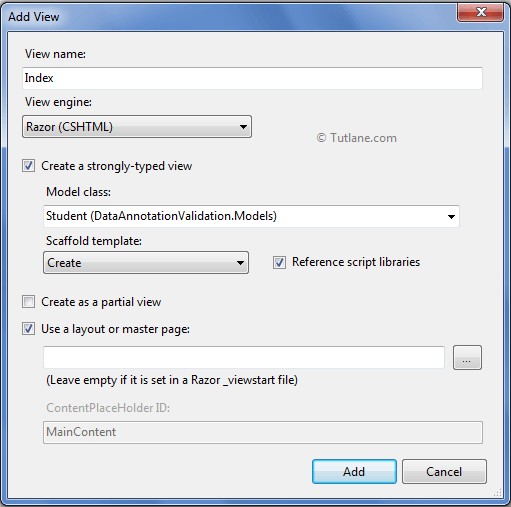
For Adding View just right click inside Index ActionResult Method and Select "Add View" to create the view template for our Index form.
Here in below snapshot I have selected View engine as Razor and we are going to create a strongly type view for that I have selected Model class Student and we want to create an input form for that I have selected Create in Scaffold template finally click on Add button
After adding view here below is a complete View of Index.cshtml which is generated
@model DataAnnotationValidation.Models.Student
@{
ViewBag.Title = "Index";
}
<h2>Index</h2>
@using (Html.BeginForm()) {
@Html.ValidationSummary(true)
<fieldset>
<legend>Student</legend>
<div class="editor-label">
@Html.LabelFor(model => model.StudentName)
</div>
<div class="editor-field">
@Html.EditorFor(model => model.StudentName)
@Html.ValidationMessageFor(model => model.StudentName)
</div>
<div class="editor-label">
@Html.LabelFor(model => model.StudentDOB)
</div>
<div class="editor-field">
@Html.EditorFor(model => model.StudentDOB)
@Html.ValidationMessageFor(model => model.StudentDOB)
</div>
<div class="editor-label">
@Html.LabelFor(model => model.StudentEmailID)
</div>
<div class="editor-field">
@Html.EditorFor(model => model.StudentEmailID)
@Html.ValidationMessageFor(model => model.StudentEmailID)
</div>
<div class="editor-label">
@Html.LabelFor(model => model.StudentFees)
</div>
<div class="editor-field">
@Html.EditorFor(model => model.StudentFees)
@Html.ValidationMessageFor(model => model.StudentFees)
</div>
<div class="editor-label">
@Html.LabelFor(model => model.StudentAddress)
</div>
<div class="editor-field">
@Html.EditorFor(model => model.StudentAddress)
@Html.ValidationMessageFor(model => model.StudentAddress)
</div>
<div class="editor-label">
@Html.LabelFor(model => model.Password)
</div>
<div class="editor-field">
@Html.EditorFor(model => model.Password)
@Html.ValidationMessageFor(model => model.Password)
</div>
<div class="editor-label">
@Html.LabelFor(model => model.ConfirmPassword)
</div>
<div class="editor-field">
@Html.EditorFor(model => model.ConfirmPassword)
@Html.ValidationMessageFor(model => model.ConfirmPassword)
</div>
<p>
<input type="submit" value="Create"/>
</p>
</fieldset>
}
<div>
@Html.ActionLink("Back to List", "Index")
</div>
@section Scripts {
@Scripts.Render("~/bundles/jqueryval")
}
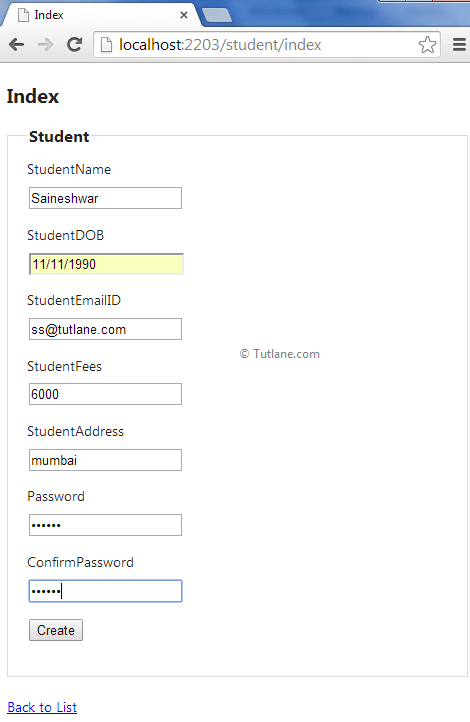
Now just run application and entering URL http://localhost:####/student/index to access page. Our Final output before entering validate data

Our form will be like as shown below after enter data