ASP.NET Web API is an ideal platform for building Restful applications on the .NET Platform. Using ASP.NET Web API, it's easy to build HTTP service and reach a broad range of clients, including browsers and mobile, tablets, phablets, all large and small devices. It's easy to create Web API as compared to that of WCF services.
In WCF services, we have to configure binding to make it work, whereas, in asp.net WEB API, we don't require to do this.
Currently, most mobile devices, browsers, and tablets are the medium for accessing most of the internet. In this, people are also using mobile apps most, and to provide data to apps. We are now going to use the Microsoft new technology called asp.net Web API.
Also, one good thing in Web API is that when the user sends a request to the web application for getting a response in JSON format, then we need to pass response headers as (contentType: 'application/json; charset=utf-8') and for getting XML as the response we need to pass (contentType: 'application/xml; charset=utf-8') both response and request return by a single method. If we want to do the same thing in web service, we need to create 2 different methods for handling requests, one for sending responses in JSON format and another for getting a response in XML, and writing binding for these methods is a big task.
Asp.net mvc resides in System.Web.Mvc namespace same like that web api resides in System.Web.Http namespace and asp.net mvc controller inherited from [Controller] and web api controller inherited from [ApiController]. In mvc we have an action method that gets called from URL to handle the request, whereas, in Web API, we have Http verbs method to handle the request.
To understand in more detail, let’s create an asp.net mvc web api application. In this application, we will learn how to insert data in the database using Web API and Rewrite data from the database using web API display it on View using asp.net mvc. We will have a simple textbox for inserting comments and displaying it on the page using asp.net web api in asp.net mvc application.
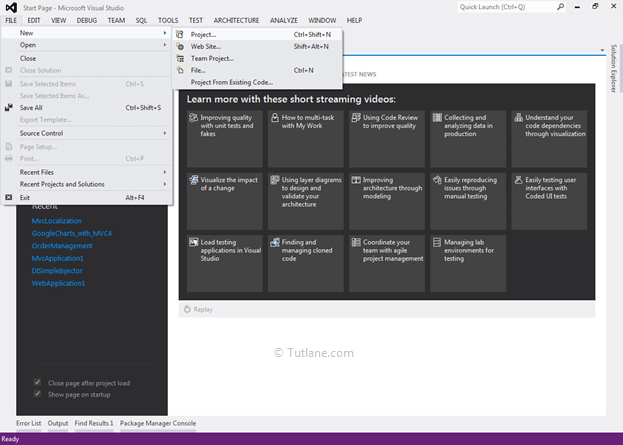
Let's start with creating a new asp.net mvc 4 application for that Open visual studio à Go to File à Select New à Select Project.
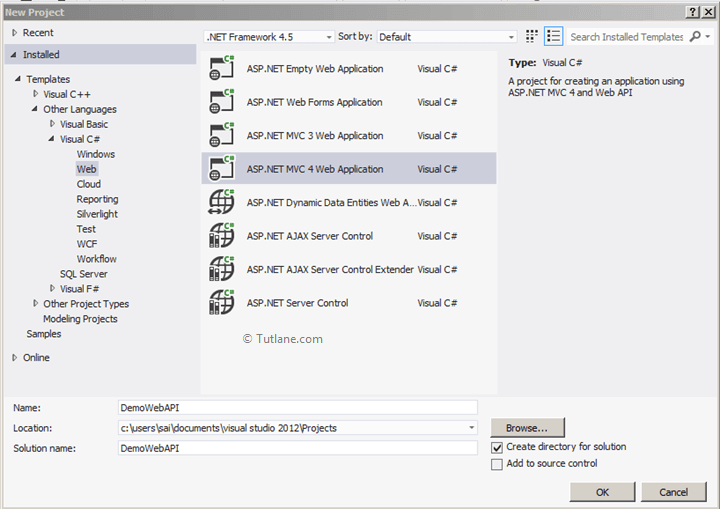
After that, you will see a new dialog for selecting your Template and Project type. From Templates, select Visual C# à inside that select Web and then project type select ASP.NET MVC 4 Web Application. Here we are giving the name “DemoWebAPI” then finally click on the OK button.
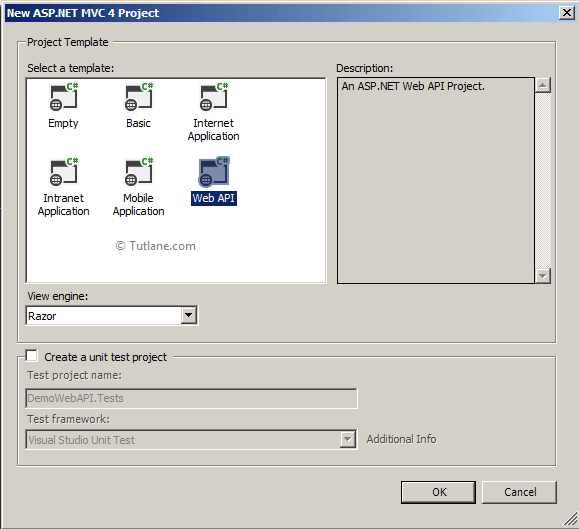
After naming and click on the OK button, a new dialog will pop up for selecting a template in that Select Web API template and set view engine as Razor. We will not create Unit testing for this project; hence, do not check this option and finally click OK like as shown below.
After selecting all options, click on the OK button, our asp.net mvc project will create like, as shown below.
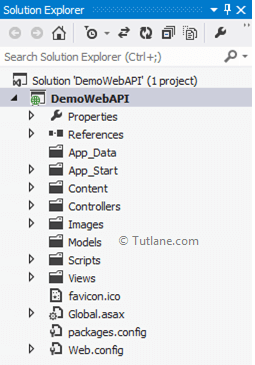
After creating the project, we will see a normal folder structure similar to the MVC folder structure. If we want to see a difference, then open the folder controller. It has 2 controllers.
1) HomeController
2) ValuesController
These two controllers are derived from different classes. HomeController is derived from the controller, and ValuesController is derived from ApiController.
HomeController will contain code like as shown below.
public class HomeController: Controller
{
public ActionResult Index()
{
return View();
}
}
ValuesController will contain code like as shown below.
public class ValuesController : ApiController
{
}
Now we will create a new model in the asp.net web api application.
We are going to Add a Model with a Name Comment. In Solution Explorer, right-click on Models folder Select Add à then select Class à Name the class as Comment and finally click on Add button to create Model.
Our new model (Comment) will contain code like as shown below.
using System;
using System.Collections.Generic;
using System.ComponentModel.DataAnnotations;
using System.Linq;
using System.Web;
namespace DemoWebAPI.Models
{
public class Comment
{
[Key]
public int CommentID { get; set; }
public string UserComment { get; set; }
public DateTime? Commentdate { get; set; }
}
}
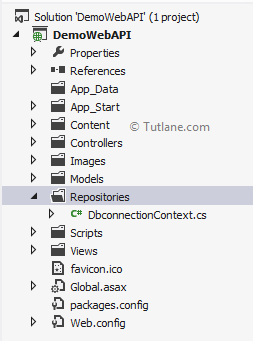
After adding Comment Model now, we will add a folder with Name Repositories; after that, we will use the Code First Approach for accessing the database. We will add class DbconnectionContext, which will be inheriting from DbContext.
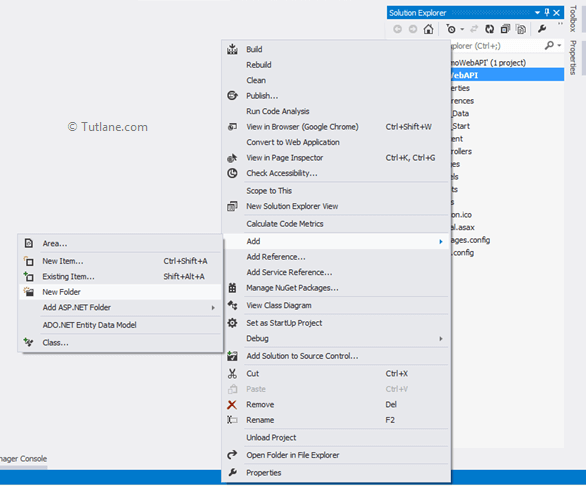
To add Repositories folder, right-click on the DemoWebAPI from the list select Add à then Add New Folder and name it as Repositories.
After adding the Repositories folder, we will add a class inside the Repositories folder with Name DbconnectionContext as shown below.
After adding DbconnectionContext open class that will contain a simple class with name DbconnectionContext now Inherit from DbContext Class after this step in DbconnectionContext constructor, we are going call base class (DbconnectionContext) and Provide connection string in it. After that, add a Dbset with name comment in DbconnectionContext class.
using DemoWebAPI.Models;
using System;
using System.Collections.Generic;
using System.Data.Entity;
using System.Linq;
using System.Web;
namespace DemoWebAPI.Repositories
{
public class DbconnectionContext : DbContext
{
public DbconnectionContext(): base("DefaultConnection")
{
}
public DbSet<Comment> Comment { get; set; }
}
}
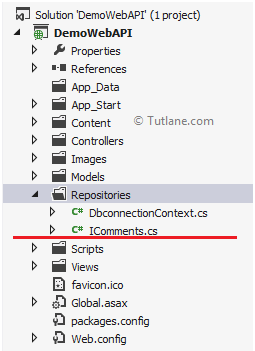
After adding the Repositories folder and DbconnectionContext class, we will add Interface in the Repositories folder with Name IComments.cs.
For adding interface in this folder right click on Repositories folder, then from the list select Add à then Add new item after selecting a new dialog of Add New Item will pop up from that Interface name it as IComments.cs and click on Add button.
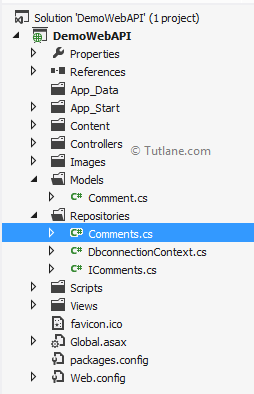
After adding the interface, let’s add a class with Name Comments in the Repositories folder that will inherit Icomment Interface like as shown below.
After adding class and interface, let’s declare a method in Icomment Interface. We will add 2 methods to this interface, one for Inserting comments and the others for displaying comments.
using DemoWebAPI.Models;
using System;
using System.Collections.Generic;
using System.Linq;
using System.Text;
using System.Threading.Tasks;
namespace DemoWebAPI.Repositories
{
interface IComments
{
void InsertComment(Comment Comment); //Inserting
IEnumerable<Comment> ListofComment(); //List of Comment
}
}
Now we will make comments class inheriting from the IComments interface and implement it.
using System;
using System.Collections.Generic;
using System.Linq;
using System.Web;
using DemoWebAPI.Models;
namespace DemoWebAPI.Repositories
{
public class Comments: IComments
{
public void InsertComment(Comment Comment)
{
using (DbconnectionContext context = new DbconnectionContext())
{
context.Comment.Add(Comment);
context.SaveChanges();
}
}
public IEnumerable<Comment> ListofComment()
{
using (DbconnectionContext context = new DbconnectionContext())
{
var listofcomments = from comments in context.Comment
Select comments;
return listofcomments;
}
}
}
}
After adding & implementing the class, let’s add a connection to the database. We will add a connection string in Web.config because we need to tell it where to create the Database.
<connectionStrings>
<add name="DefaultConnection" providerName="System.Data.SqlClient" connectionString="Data Source=Sai-PC;
Database=AllCommentsDB; UID=sa; Password=Pass$123; App=EntityFramework" />
</connectionStrings>
After adding connection string to Web.config now let’s work with API Controller [ValuesController]. Open ValuesController class file and make following changes to method (Post and GetAlldata).
using DemoWebAPI.Models;
using DemoWebAPI.Repositories;
using System;
using System.Collections.Generic;
using System.Linq;
using System.Net;
using System.Net.Http;
using System.Web.Http;
namespace DemoWebAPI.Controllers
{
public class ValuesController : ApiController
{
IComments Icom;
public ValuesController()
{
Icom = new Comments();
}
// GET api/values
publicIEnumerable<Comment> GetAlldata()
{
return Icom.ListofComment();
}
// GET api/values/5
public string Get(int id)
{
return"value";
}
// POST api/values
public void Post([FromBody]Comment Comment)
{
Icom.InsertComment(Comment);
}
// PUT api/values/5
public void Put(int id, [FromBody]string value)
{
}
// DELETE api/values/5
public void Delete(int id)
{
}
}
}
Now we are going to work with * Real * Controller [HomeController]. Open HomeController and make the following changes to it.
Following is the code snippet of HomeController after making changes.
using DemoWebAPI.Models;
using DemoWebAPI.Repositories;
using System;
using System.Collections.Generic;
using System.Linq;
using System.Web;
using System.Web.Mvc;
namespace DemoWebAPI.Controllers
{
public class HomeController : Controller
{
IComments Icom;
public HomeController()
{
Icom = new Comments();
}
[HttpGet]
public ActionResult InsertComment()
{
return View(new Comment());
}
}
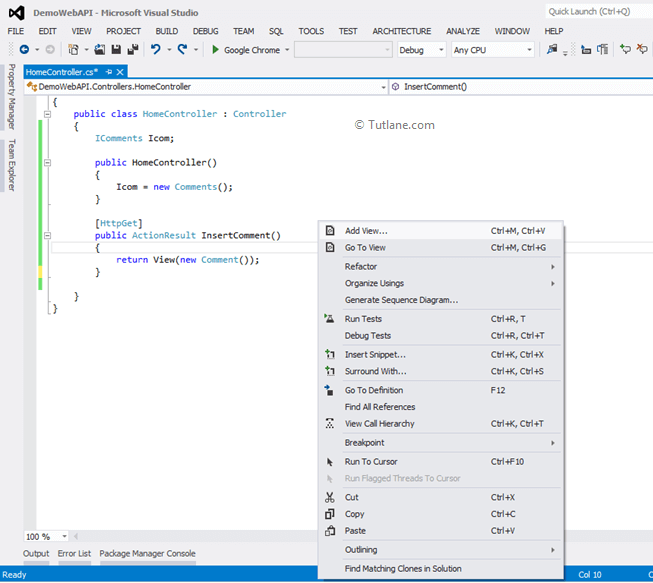
}After making changes in the controller, let’s add a view to all this stuff.
To add view, right-click inside the controller action method (InsertComment), select the option Add View.
After selecting the Add View option, a New Wizard will pop up with Name (Add View). It will have a view name the same name as Action Method inside which we right-click to add View. In this example, we will create a Strongly-Typed view for that we check this option, and in Model class, we selected the Comment model class.
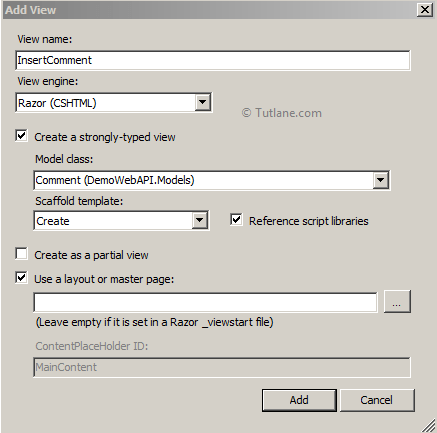
After selecting the required option, click on the Add button. A new view will be created inside the Views folder, and in that, we will have a folder with the name of the controller inside that our view will be placed, and our view (InserComment) will contain code like as shown below.
@model DemoWebAPI.Models.Comment
@{
ViewBag.Title = "InsertComment";
}
<h2>InsertComment</h2>
@using (Html.BeginForm())
{
@Html.ValidationSummary(true)
<fieldset>
<legend>Comment</legend>
<div class="editor-label">
@Html.LabelFor(model => model.UserComment)
</div>
<div class="editor-field">
@Html.EditorFor(model => model.UserComment)
@Html.ValidationMessageFor(model => model.UserComment)
</div>
<p>
<input type="submit" value="Create"/>
</p>
</fieldset>
}
<div>
@Html.ActionLink("Back to List", "Index")
</div>
@section Scripts {
@Scripts.Render("~/bundles/jqueryval")
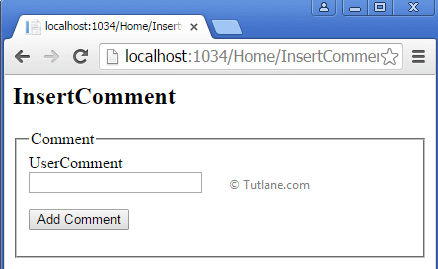
Now save application and RUN to access application URL will be like "http://localhost:####/home/InsertComment".
After creating a view, let’s add Ajax to post data and getting data from the API controller.
The first thing we need to add the following scripts Reference in our applications.
<script src="~/Scripts/jquery-1.7.1.min.js"></script>
<script src="~/Scripts/jquery.unobtrusive-ajax.min.js"></script>After adding scripts Reference we are going to write Function for inserting Data using Ajax. In this script we set Ajax Parameter which is required to post data.
var Comment = { "UserComment": $("#UserComment").val() };
type: "POST",
data: Comment,
url: '@Url.Action("Post", "api/values")',
success: function (data) {
GetData();
},
We will set Ajax's first parameter type to “Post” because we are going to post data to the APIController method and another parameter [ data: Comment ] for this parameter we are going to pass the user entered a comment.
After setting the data parameter, we need to define Ajax's URL parameter, the ValuesController post method URL [api/values]. Suppose we want to see how the post method looks like, open ValuesController in the controller folder, and find the Post's method name. The final parameter is a success. In this, we are not going to return any data we are calling another method to get data [GetData()]
Following is the script for inserting data using Ajax in asp.net mvc applications using web api.
<script type="text/javascript">
function PostData() {
debugger;
var Commenta = { "UserComment": $("#UserComment").val() };
$.ajax({
type: "POST",
data: Commenta,
url: '@Url.Action("Post", "api/values")',
success: function (data) {
GetData();
},
});
}
</script>
Following is the method we are calling for Inserting data.
// POST api/values
public void Post([FromBody]Comment Comment)
{
Icom.InsertComment(Comment);
}
After creating the data insertion function, we need to show data that users have added to add another ajax method to get data [GetData()]. We are going to set parameters for getting data from Web API methods. In the following script, we set Ajax Parameter, which is required to GET data.
type: "GET",
contentType: 'application/json; charset=utf-8',
url: 'http://localhost:1986/api/values',
dataType: "json",
success: function (data) {
$.each(data, function (i, mobj) {
$("#DivCom").append('<table class="table"><tr><td width="50px">' mobj.UserComment '</td></tr>
<div style="margin-top: 2px"></div>');
});
$("#DivCom").append('</table>');
}
We will set Ajax's first parameter type to “GET” after that. We will get data from the APIController method for that, we are going to set parameter [contentType: 'application/json; charset=utf-8'] after setting contentType. We need to define Ajax's URL parameter, which will be from the ValuesController GET method URL [api/values] if we want to see how the GET method looks like they open ValuesController and find the method name as GetAlldata.
After setting URL, we will set dataType in which format we want to receive data in case we want in JSON format we need to define like this [dataType: "json"]. The last parameter is a success that is returning data we will get data in an object. Using the $.each object, we will iterate it and show data in a table format by appending data in table format.
<script type="text/javascript">
function GetData() {
$("#DivCom").empty();
$.ajax({
type: "GET",
contentType: 'application/json; charset=utf-8',
url: 'http://localhost:1986/api/values',
dataType: "json",
success: function (data) {
$.each(data, function (i, mobj) {
$("#DivCom").append('<table class="table"><tr><td width="50px">' mobj.UserComment '</td></tr>
<div style="margin-top: 2px"></div>');
});
$("#DivCom").append('</table>');
}
});
}
</script>
Our method for getting all data in the controller will be like as shown below.
// GET api/values
public IEnumerable<Comment> GetAlldata()
{
return Icom.ListofComment();
}
After creating the method, Now we will call this method on Click of Add Comment Button.
<inputtype="button"onclick="PostData();"value="Add Comment"/>
After completing all stuff, we will have a look at all controllers and views code snippets. The following are the complete code snippets of all controllers and views.
Following is the complete code snippet of valuescontroller in asp.net mvc web api application.
using DemoWebAPI.Models;
using DemoWebAPI.Repositories;
using System;
using System.Collections.Generic;
using System.Linq;
using System.Net;
using System.Net.Http;
using System.Web.Http;
namespace DemoWebAPI.Controllers
{
public class ValuesController : ApiController
{
IComments Icom;
public ValuesController()
{
Icom = new Comments();
}
// GET api/values
public IEnumerable<Comment> GetAlldata()
{
return Icom.ListofComment();
}
// GET api/values/5
public string Get(int id)
{
return "value";
}
// POST api/values
public void Post([FromBody]Comment Comment)
{
Icom.InsertComment(Comment);
}
// PUT api/values/5
public void Put(int id, [FromBody]string value)
{
}
// DELETE api/values/5
public void Delete(int id)
{
}
}
}
Following is the code complete code of HomeController in asp.net mvc web api application.
using DemoWebAPI.Models;
using DemoWebAPI.Repositories;
using System;
using System.Collections.Generic;
using System.Linq;
using System.Web;
using System.Web.Mvc;
namespace DemoWebAPI.Controllers
{
public class HomeController : Controller
{
IComments Icom;
public HomeController()
{
Icom = new Comments();
}
[HttpGet]
public ActionResult InsertComment()
{
return View(new Comment());
}
}
}
Following is the code snippet of InsertComment view in asp.net mvc web api application.
@model DemoWebAPI.Models.Comment
@{
ViewBag.Title = "InsertComment";
Layout = null;
}
<style>
.table {
width: 70%;
max-width: 70%;
margin-bottom: 5px;
background-color:aliceblue;
}
</style>
<script src="~/Scripts/jquery-1.7.1.min.js"></script>
<script src="~/Scripts/jquery.unobtrusive-ajax.min.js"></script>
<script src="~/Scripts/jquery-1.9.1.min.js"></script>
<link href="~/bootstrap/css/bootstrap.min.css" rel="stylesheet"/>
<script src="~/bootstrap/js/bootstrap.min.js"></script>
<script type="text/javascript">
function PostData() {
var Commenta = { "UserComment": $("#UserComment").val() };
$.ajax({
type: "POST",
data: Commenta,
url: '@Url.Action("Post", "api/values")',
success: function (data) {
GetData();
},
});
}
</script>
<script type="text/javascript">
function GetData() {
$("#DivCom").empty();
$.ajax({
type: "GET",
contentType: 'application/json; charset=utf-8',
url: 'http://localhost:1034/api/values',
dataType: "json",
success: function (data) {
$.each(data, function (i, mobj) {
$("#DivCom").append('<table class="table"><tr><td width="50px">' mobj.UserComment '</td></tr><div style="margin-top: 2px"></div>');
});
$("#DivCom").append('</table>');
}
});
}
</script>
@using (Html.BeginForm())
{
@Html.ValidationSummary(true)
<div class="container">
<div style="margin-top: 5px"></div>
<div class="col-md-12">
@Html.LabelFor(model => model.UserComment)
</div>
<div style="margin-top: 5px"></div>
<div class="col-md-12">
@Html.TextBoxFor(model => model.UserComment, new { @class = "form-control" })
@Html.ValidationMessageFor(model => model.UserComment)
</div>
<div style="margin-top: 5px"></div>
<div class="col-md-12">
<input type="button" onclick="PostData();" value="Add Comment"/>
</div>
<div style="margin-top: 10px"></div>
<div id="DivCom">
</div>
</div>
}
@section Scripts {
@Scripts.Render("~/bundles/jqueryval")
}
After completion of coding, save your application and run with a URL like "http://localhost:####/home/InsertComment".
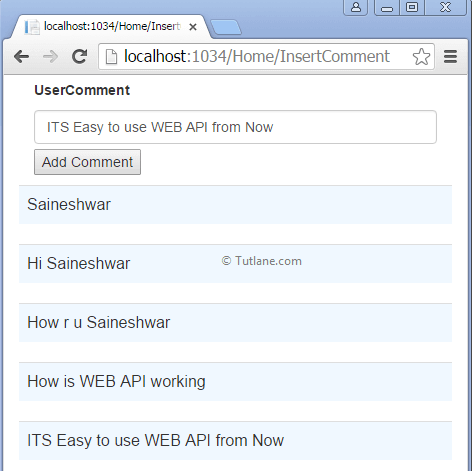
After accessing the page, enter a comment in the comment field and click on the Add Comment button the first going to get called is the PostData function after that, it will call the GetData function result will be like as shown below.
If you check the output, it looks slightly formatted because we added Bootstrap in the design. To add Bootstrap to the solution, download Bootstrap from the link given below and add the entire folder to your project "https://github.com/twbs/bootstrap/releases/download/v3.3.5/bootstrap-3.3.5-dist.zip". After adding just reference following files to view where you want to use Bootstrap.
<link href="~/bootstrap/css/bootstrap.min.css" rel="stylesheet"/>
<script src="~/bootstrap/js/bootstrap.min.js"></script>
This is how we can create asp.net web api service and consume it in asp.net mvc application.