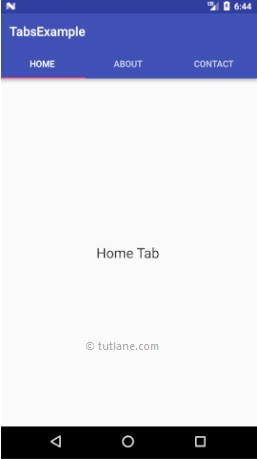
In android, we can create swipeable tabs layout using Swipe Views to switch between the tabs in the android application. The Swipe Views in android provides navigation between the sibling screens such as tabs with a horizontal finger gesture, sometimes it is called horizontal paging.
By using android ViewPager widget, we can create Swipe Views in our android applications. In android, ViewPager is a layout widget in which each child view is treated as a separate tab in the layout.
To set up our tab layout with ViewPager, we need to add a <ViewPager> element in our XML layout. For example, to make each child view in the swipe view to consume the entire tab layout, our layout should be like as shown following.
<android.support.v4.view.ViewPager
xmlns:android="http://schemas.android.com/apk/res/android"
android:id="@+id/pager"
android:layout_width="match_parent"
android:layout_height="match_parent" />
To insert child views that represent each page, we need to add this layout to PagerAdapter. There are two kinds of adapters that we can use it in our android application.
| Adapter | Description |
|---|
| FragmentPagerAdapter |
This adapter is best, when we are navigating between sibling screens which representing a fixed, small number of pages. |
| FragmentStatePagerAdapter |
This is best for paging across a collection of objects for which the number of pages is undetermined. It destroys fragments as the user navigates to other pages, minimizing memory usage. |
Now we will see how to create a tab layout with swipe views for switching between the tabs using ViewPager and Fragments in android application like as shown following.

Android Tabs Layout Example
Following is the example of creating a tabs layout with swipe views for switching between the tabs using material design in the android application.
Create a new android application using android studio and give names as TabsExample. In case if you are not aware of creating an app in android studio check this article Android Hello World App.
To start creating the tabs layout in our android application, we need to add the following libraries in dependencies section of build.gradle file in Module section like as shown below.
dependencies {
compile 'com.android.support:appcompat-v7:25.3.1'
compile 'com.android.support:design:25.3.1'
}
Here we are going to show the tabs using android ToolBar and TabLayout so we need to remove the actionbar from a layout using styles, for that open styles.xml file from /res/values folder and that should contain the code like as shown below.
styles.xml
<resources>
<!-- Base application theme. -->
<style name="AppTheme" parent="Theme.AppCompat.Light.DarkActionBar">
<!-- Customize your theme here. -->
<item name="colorPrimary">@color/colorPrimary</item>
<item name="colorPrimaryDark">@color/colorPrimaryDark</item>
<item name="colorAccent">@color/colorAccent</item>
<item name="windowActionBar">false</item>
<item name="windowNoTitle">true</item>
</style>
</resources>
To show the different tabs using fragments and ViewPager in our android application, we need to create different fragments and layouts like as shown below.
Now create layout resource file homelayout.xml in \res\layout path, for that right-click on your layout folder à Go to New à select Layout Resource File and give name as homelayout.xml.
Once we create a new layout resource file homelayout.xml, open it and write the code like as shown below
homelayout.xml
<?xml version="1.0" encoding="utf-8"?>
<RelativeLayout xmlns:android="http://schemas.android.com/apk/res/android"
android:layout_width="match_parent"
android:layout_height="match_parent"
android:orientation="vertical">
<TextView
android:id="@+id/textView"
android:layout_width="wrap_content"
android:layout_height="wrap_content"
android:layout_centerInParent="true"
android:text="Homw Tab"
android:textAppearance="?android:attr/textAppearanceLarge"/>
</RelativeLayout>
Now we need to create fragment file HomeFragment.java in \java\com.tutlane.tabsexample path, for that right click on your application folder à Go to New à select Java Class and give name as HomeFragment.java.
Once we create a new fragment file HomeFragment.java, open it and write the code like as shown below
HomeFragment.java
package com.tutlane.tabsexample;
import android.support.v4.app.Fragment; import android.os.Bundle;
import android.view.LayoutInflater;
import android.view.View;
import android.view.ViewGroup;
/**
* Created by tutlane on 09-01-2018.
*/
public class HomeFragment extends Fragment {
@Override
public View onCreateView(LayoutInflater inflater, ViewGroup viewGroup, Bundle savedInstanceState){
return inflater.inflate(R.layout.homelayout, viewGroup, false);
}
}
If you observe above code, we are referring homelayout file which created previously same way we need to create other two fragment files and layout files.
aboutlayout.xml
<?xml version="1.0" encoding="utf-8"?>
<RelativeLayout xmlns:android="http://schemas.android.com/apk/res/android"
android:layout_width="match_parent"
android:layout_height="match_parent"
android:orientation="vertical">
<TextView
android:id="@+id/textView"
android:layout_width="wrap_content"
android:layout_height="wrap_content"
android:layout_centerInParent="true"
android:text="About Tab"
android:textAppearance="?android:attr/textAppearanceLarge"/>
</RelativeLayout>
AboutFragment.java
package com.tutlane.tabsexample;
import android.support.v4.app.Fragment; import android.os.Bundle;
import android.view.LayoutInflater;
import android.view.View;
import android.view.ViewGroup;
/**
* Created by tutlane on 09-01-2018.
*/
public class AboutFragment extends Fragment {
@Override
public View onCreateView(LayoutInflater inflater, ViewGroup viewGroup, Bundle savedInstanceState){
return inflater.inflate(R.layout.aboutlayout, viewGroup, false);
}
}
contactlayout.xml
<?xml version="1.0" encoding="utf-8"?>
<RelativeLayout xmlns:android="http://schemas.android.com/apk/res/android"
android:layout_width="match_parent"
android:layout_height="match_parent"
android:orientation="vertical">
<TextView
android:id="@+id/textView"
android:layout_width="wrap_content"
android:layout_height="wrap_content"
android:layout_centerInParent="true"
android:text="About Tab"
android:textAppearance="?android:attr/textAppearanceLarge"/>
</RelativeLayout>
ContactFragment.java
package com.tutlane.tabsexample;
import android.support.v4.app.Fragment; import android.os.Bundle;
import android.view.LayoutInflater;
import android.view.View;
import android.view.ViewGroup;
/**
* Created by tutlane on 09-01-2018.
*/
public class ContactFragment extends Fragment {
@Override
public View onCreateView(LayoutInflater inflater, ViewGroup viewGroup, Bundle savedInstanceState){
return inflater.inflate(R.layout.contactlayout, viewGroup, false);
}
}
We are done with creation of required tabs for tab layout. Now we need to create a PagerAdapter to hook all these child views into a single layout for that right-click on your application folder à Go to New à select Java Class and give name as TabsAdapter.java.
TabsAdapter.java
package com.tutlane.tabsexample;
import android.support.v4.app.Fragment;
import android.support.v4.app.FragmentManager;
import android.support.v4.app.FragmentStatePagerAdapter;
/**
* Created by tutlane on 19-12-2017.
*/
public class TabsAdapter extends FragmentStatePagerAdapter {
int mNumOfTabs;
public TabsAdapter(FragmentManager fm, int NoofTabs){
super(fm);
this.mNumOfTabs = NoofTabs;
}
@Override
public int getCount() {
return mNumOfTabs;
}
@Override
public Fragment getItem(int position){
switch (position){
case 0:
HomeFragment home = new HomeFragment();
return home;
case 1:
AboutFragment about = new AboutFragment();
return about;
case 2:
ContactFragment contact = new ContactFragment();
return contact;
default:
return null;
}
}
}
If you observe above code, we used FragmentManager and FragmentStatePagerAdapter to hook all the child views in tab layout.
It’s time to display the tabs in android app layout for that open activity_main.xml file from \res\layout folder path and write the code like as shown below.
activity_main.xml
<?xml version="1.0" encoding="utf-8"?>
<RelativeLayout
android:id="@+id/main_layout"
xmlns:android="http://schemas.android.com/apk/res/android"
xmlns:app="http://schemas.android.com/apk/res-auto"
xmlns:tools="http://schemas.android.com/tools"
android:layout_width="match_parent"
android:layout_height="match_parent"
tools:context=".MainActivity">
<android.support.v7.widget.Toolbar
android:id="@+id/tool_bar"
android:layout_width="match_parent"
android:layout_height="wrap_content"
android:layout_alignParentTop="true"
android:background="?attr/colorPrimary"
android:elevation="6dp"
android:minHeight="?attr/actionBarSize"
android:theme="@style/ThemeOverlay.AppCompat.Dark.ActionBar"
app:popupTheme="@style/ThemeOverlay.AppCompat.Light"/>
<android.support.design.widget.TabLayout
android:id="@+id/tab_layout"
android:layout_width="match_parent"
android:layout_height="wrap_content"
android:layout_below="@+id/tool_bar"
android:background="?attr/colorPrimary"
android:elevation="6dp"
android:minHeight="?attr/actionBarSize"
android:theme="@style/ThemeOverlay.AppCompat.Dark.ActionBar"/>
<android.support.v4.view.ViewPager
android:id="@+id/view_pager"
android:layout_width="match_parent"
android:layout_height="fill_parent"
android:layout_below="@id/tab_layout"/>
</RelativeLayout>
Now open your main activity file MainActivity.java from \java\com.tutlane.loginexample path and write the code like as shown below
MainActivity.java
package com.tutlane.tabsexample;
import android.support.design.widget.TabLayout;
import android.support.v4.view.ViewPager;
import android.support.v7.app.AppCompatActivity;
import android.os.Bundle;
import android.support.v7.widget.Toolbar;
public class MainActivity extends AppCompatActivity {
@Override
protected void onCreate(Bundle savedInstanceState) {
super.onCreate(savedInstanceState);
setContentView(R.layout.activity_main);
Toolbar toolbar = (Toolbar)findViewById(R.id.tool_bar);
setSupportActionBar(toolbar);
TabLayout tabLayout = (TabLayout) findViewById(R.id.tab_layout);
tabLayout.addTab(tabLayout.newTab().setText("Home"));
tabLayout.addTab(tabLayout.newTab().setText("About"));
tabLayout.addTab(tabLayout.newTab().setText("Contact"));
tabLayout.setTabGravity(TabLayout.GRAVITY_FILL);
final ViewPager viewPager =(ViewPager)findViewById(R.id.view_pager);
TabsAdapter tabsAdapter = new TabsAdapter(getSupportFragmentManager(), tabLayout.getTabCount());
viewPager.setAdapter(tabsAdapter);
viewPager.addOnPageChangeListener(new TabLayout.TabLayoutOnPageChangeListener(tabLayout));
tabLayout.setOnTabSelectedListener(new TabLayout.OnTabSelectedListener() {
@Override
public void onTabSelected(TabLayout.Tab tab) {
viewPager.setCurrentItem(tab.getPosition());
}
@Override
public void onTabUnselected(TabLayout.Tab tab) {
}
@Override
public void onTabReselected(TabLayout.Tab tab) {
}
});
}
}
If you observe above code, we used ViewPager to attach tabs adapter (TabsAdapter) to show the tabs in tab layout based on our requirements.
Our android application manifest file (AndroidManifest.xml) should contain the code like as shown below.
AndroidManifest.xml
<?xml version="1.0" encoding="utf-8"?>
<manifest xmlns:android="http://schemas.android.com/apk/res/android"
package="com.tutlane.tabsexample">
<application
android:allowBackup="true"
android:icon="@mipmap/ic_launcher"
android:label="@string/app_name"
android:roundIcon="@mipmap/ic_launcher_round"
android:supportsRtl="true"
android:theme="@style/AppTheme">
<activity android:name=".MainActivity">
<intent-filter>
<action android:name="android.intent.action.MAIN" />
<category android:name="android.intent.category.LAUNCHER" />
</intent-filter>
</activity>
</application>
</manifest>
Output of Android Tabs Layout Example
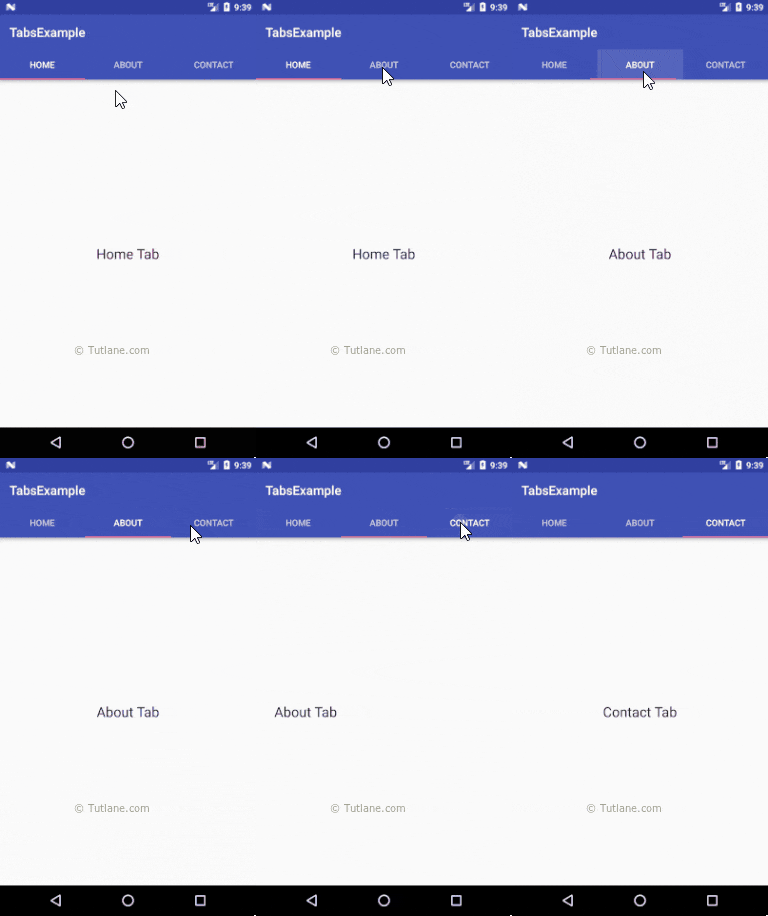
When we run above example in android emulator we will get a result like as shown below.

If you observe the above result, we implemented a tab layout with three tabs (Home, About and Contact) and whenever we click on a particular tab, automatically the respective tab content will be displayed in our application.
This is how we can create tabs layout using Fragments and ViewPager in android applications to switch between tabs based on our requirements.

